
1. Ievads
This manual provides detailed instructions for the installation, operation, and maintenance of your darkFlash Aquarius Mesh Computer Case. Please read this manual thoroughly before beginning installation to ensure proper setup and safe use of your new computer chassis.
2. Drošības informācija
Vienmēr ievērojiet šādus drošības pasākumus:
- Disconnect all power sources before installing or removing any components.
- Lai novērstu elektrostatiskās izlādes (ESD) radītos bojājumus komponentiem, valkājiet antistatisku aproci.
- Rīkojieties ar detaļām uzmanīgi, lai izvairītos no fiziskiem bojājumiem.
- Glabājiet mazas detaļas un instrumentus bērniem nepieejamā vietā.
- Ensure proper ventilation around the computer case.
3. Iepakojuma saturs
Pārliecinieties, vai iepakojumā ir visas preces:
- darkFlash Aquarius Mesh Computer Case
- Piederumu kaste (skrūves, starplikas, kabeļu saites utt.)
- Lietotāja rokasgrāmata (šis dokuments)
4. Iestatīšana un instalēšana
Follow these steps for proper component installation.
4.1. Lietas sagatavošana
Before installing components, remove the side panels. The Aquarius Mesh case typically features a tempered glass side panel and a solid metal panel.
- Locate the thumbscrews on the rear of the case securing the side panels.
- Unscrew the thumbscrews and carefully slide the panels backward, then lift them off.

1. attēls. Priekšpuse un sāni view of the darkFlash Aquarius Mesh case. Note the mesh front panel and tempered glass side panel.

2. attēls. Aizmugure view of the darkFlash Aquarius Mesh case, showing expansion slots and rear fan mount.
4.2. Mātesplates uzstādīšana
The Aquarius Mesh supports ATX, Micro-ATX, and Mini-ITX motherboards.
- Uzstādiet I/O aizsargu korpusa aizmugurē esošajā izgriezumā.
- Align your motherboard with the pre-installed standoffs. Ensure the I/O ports align with the I/O shield.
- Nostipriniet mātesplati ar atbilstošajām skrūvēm no piederumu komplekta.
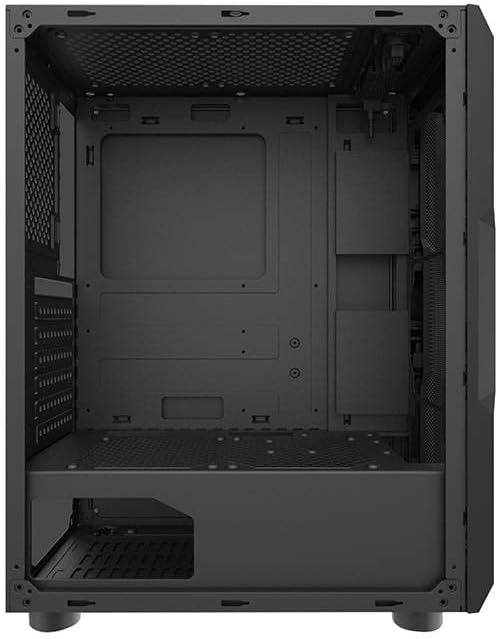
3. attēls. Interjers view of the darkFlash Aquarius Mesh case, highlighting the motherboard tray and cable routing options.
4.3. Barošanas bloka (PSU) uzstādīšana
The PSU mounts at the bottom rear of the case.
- Slide the PSU into its designated compartment from the rear of the case.
- Align the screw holes and secure the PSU with screws.
4.4. Krātuves diska instalēšana
The case provides mounting options for 3.5-inch HDDs and 2.5-inch SSDs.
- 3.5 collu cietie diski: Locate the drive cage usually beneath the PSU shroud or behind the motherboard tray. Slide the HDD into the bay and secure it with screws.
- 2.5 collu SSD diski: Mount SSDs to dedicated brackets behind the motherboard tray or on the PSU shroud. Secure with screws.
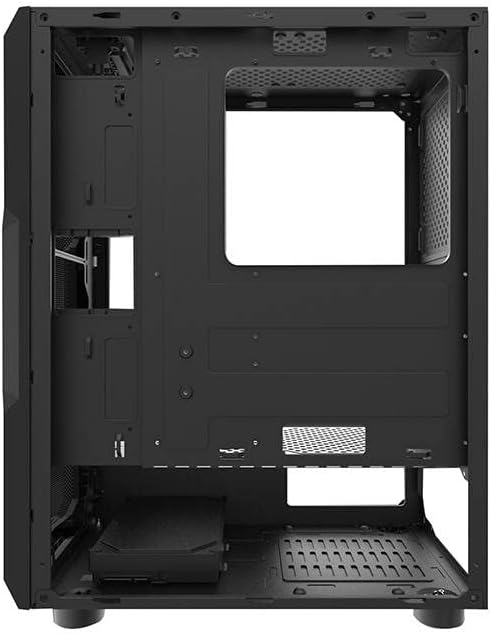
Figure 4: Rear interior view of the darkFlash Aquarius Mesh case, showing the motherboard cutout and potential SSD mounting points.
4.5. Expansion Card Installation (e.g., GPU)
- Noņemiet nepieciešamos paplašināšanas slotu pārsegus no korpusa aizmugures.
- Insert the expansion card into the appropriate PCIe slot on the motherboard.
- Secure the card with the provided screws or retention clips.
4.6. Kabeļu vadība
Izmantojiet kabeļu vadīšanas izgriezumus un nostiprināšanas punktus aiz mātesplates paliktņa, lai sakārtotu kabeļus. Tas uzlabo gaisa cirkulāciju un estētiku.
4.7. Reassembling the Case
Once all components are installed and cables are managed:
- Carefully reattach the side panels, ensuring they slide into place correctly.
- Secure the side panels with the thumbscrews.
5. Lietošanas instrukcijas
After assembly, connect your peripherals and power cable.
- Connect your monitor, keyboard, mouse, and other peripherals to the motherboard's I/O ports.
- Pievienojiet strāvas kabeli barošanas blokam un sienas kontaktligzdai.
- Press the power button located on the top panel of the case to start your computer.

5. attēls: augšdaļa view of the darkFlash Aquarius Mesh case, showing the front I/O panel with power button, reset button, USB ports, and audio jacks.
6. Apkope
Regulāra apkope palīdz nodrošināt datora komponentu optimālu veiktspēju un ilgmūžību.
- Putekļu filtri: The Aquarius Mesh case features removable dust filters (e.g., on the front, top, and bottom). Regularly remove and clean these filters with water and mild soap, or by vacuuming, to maintain good airflow. Ensure they are completely dry before reinstallation.
- Salona tīrīšana: Periodically open the case and use compressed air to remove dust buildup from fans, heatsinks, and other components.
- Ārpuses tīrīšana: Noslaukiet ārējās virsmas ar mīkstu, damp audums. Izvairieties no skarbām ķīmiskām vielām.
7. Traucējummeklēšana
Ja rodas problēmas, apsveriet šādus bieži sastopamus risinājumus:
- Nav jaudas:
- Pārliecinieties, vai barošanas bloka slēdzis ir ieslēgts (“ON”).
- Pārbaudiet visus barošanas savienojumus ar mātesplati un tās komponentiem.
- Verify the power cable is securely plugged into the wall outlet and PSU.
- Ventilatori negriežas:
- Check fan connections to the motherboard or fan controller.
- Ensure fans are not obstructed by cables or dust.
- Front Panel I/O Not Working:
- Verify that the front panel connectors (USB, audio, power/reset switches) are correctly connected to the motherboard headers. Refer to your motherboard manual for header locations.
8. Specifikācijas
| Funkcija | Detaļas |
|---|---|
| Zīmols | tumšsFlash |
| Modeļa numurs | Aquarius Mesh |
| Lietas veids | Torņa vidus |
| Materiāls | Leģētais tērauds |
| Krāsa | Melns |
| Dzesēšanas metode | Gaiss |
| Ieteicamā lietošana | Dators |
| Hard Drive Form Factor | 3.5 collas |
9. Garantija un atbalsts
For warranty information or technical support, please refer to the official darkFlash webvietnē vai sazinieties ar klientu apkalpošanas dienestu. Saglabājiet pirkuma apliecinājumu garantijas prasību iesniegšanai.
Lai saņemtu papildu palīdzību, varat apmeklēt vietni darkFlash official webvietne.