1. Ievads
This manual provides detailed instructions for the installation, operation, and maintenance of the PowMr 80A Solar Charge Controller. This device is designed to manage power flow from solar panels to batteries, ensuring efficient and safe charging for various battery types and system voltages.
1.1. video: Unboxing the PowMr PStar Series Solar Controller. This video demonstrates the contents of the product package, including the controller and user manual.
2. Drošības instrukcijas
- Ensure all wiring is correctly polarized and securely connected to prevent damage to the controller or battery.
- Always connect the battery to the charge controller first, then the solar panel. Disconnect in the reverse order.
- Uzstādiet regulatoru labi vēdināmā vietā, prom no viegli uzliesmojošiem materiāliem un tiešiem saules stariem.
- Do not attempt to disassemble or repair the controller yourself. Contact qualified personnel for service.
- Use appropriate circuit breakers or fuses for all connections to protect against overcurrent.
3. Produkts beidziesview
The PowMr 80A Solar Charge Controller features an adjustable LCD display, dual USB outputs, and supports multiple battery types. It utilizes 3-stage intelligent PWM technology for efficient charging.

3.1. attēls: Priekšpuse view of the PowMr 80A Solar Charge Controller, highlighting key technical specifications such as Max. PV Open Circuit Voltage (100V), Rated Charging Current (80A), Nominal System Voltage (12V/24V/36V/48V Auto), Charging Technology (PWM), Charge Algorithm (3-Stages), USB Interface (5V/2A*2), Net weight (0.75 kg), and Operating Temperature Range (-20°C ~ +55°C).
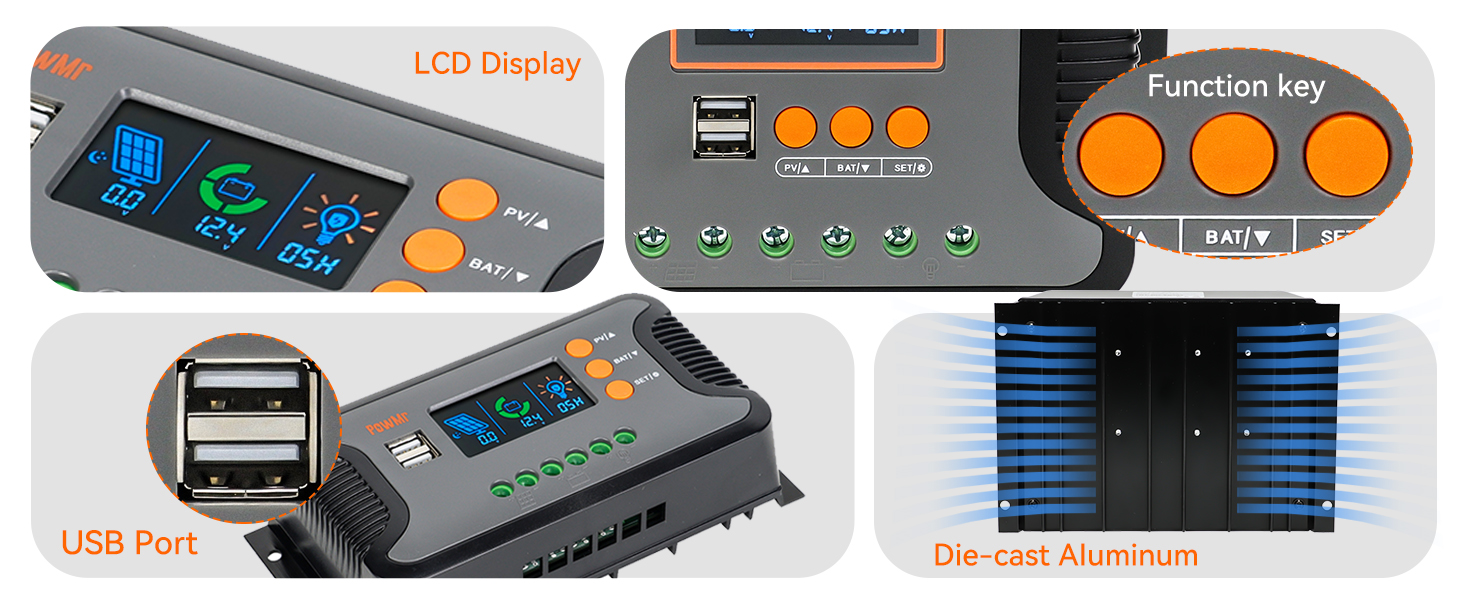
3.2. attēls: Detalizēti views of the controller's features, including the LCD display for monitoring, function keys for settings, dual USB ports for charging external devices, and the die-cast aluminum construction for heat dissipation.
3.1 Galvenās funkcijas
- Auto System Voltage Atklāšana: Automatically detects 12V, 24V, 36V, and 48V DC systems.
- High PV Input: Supports a maximum PV input open circuit voltage no 100V.
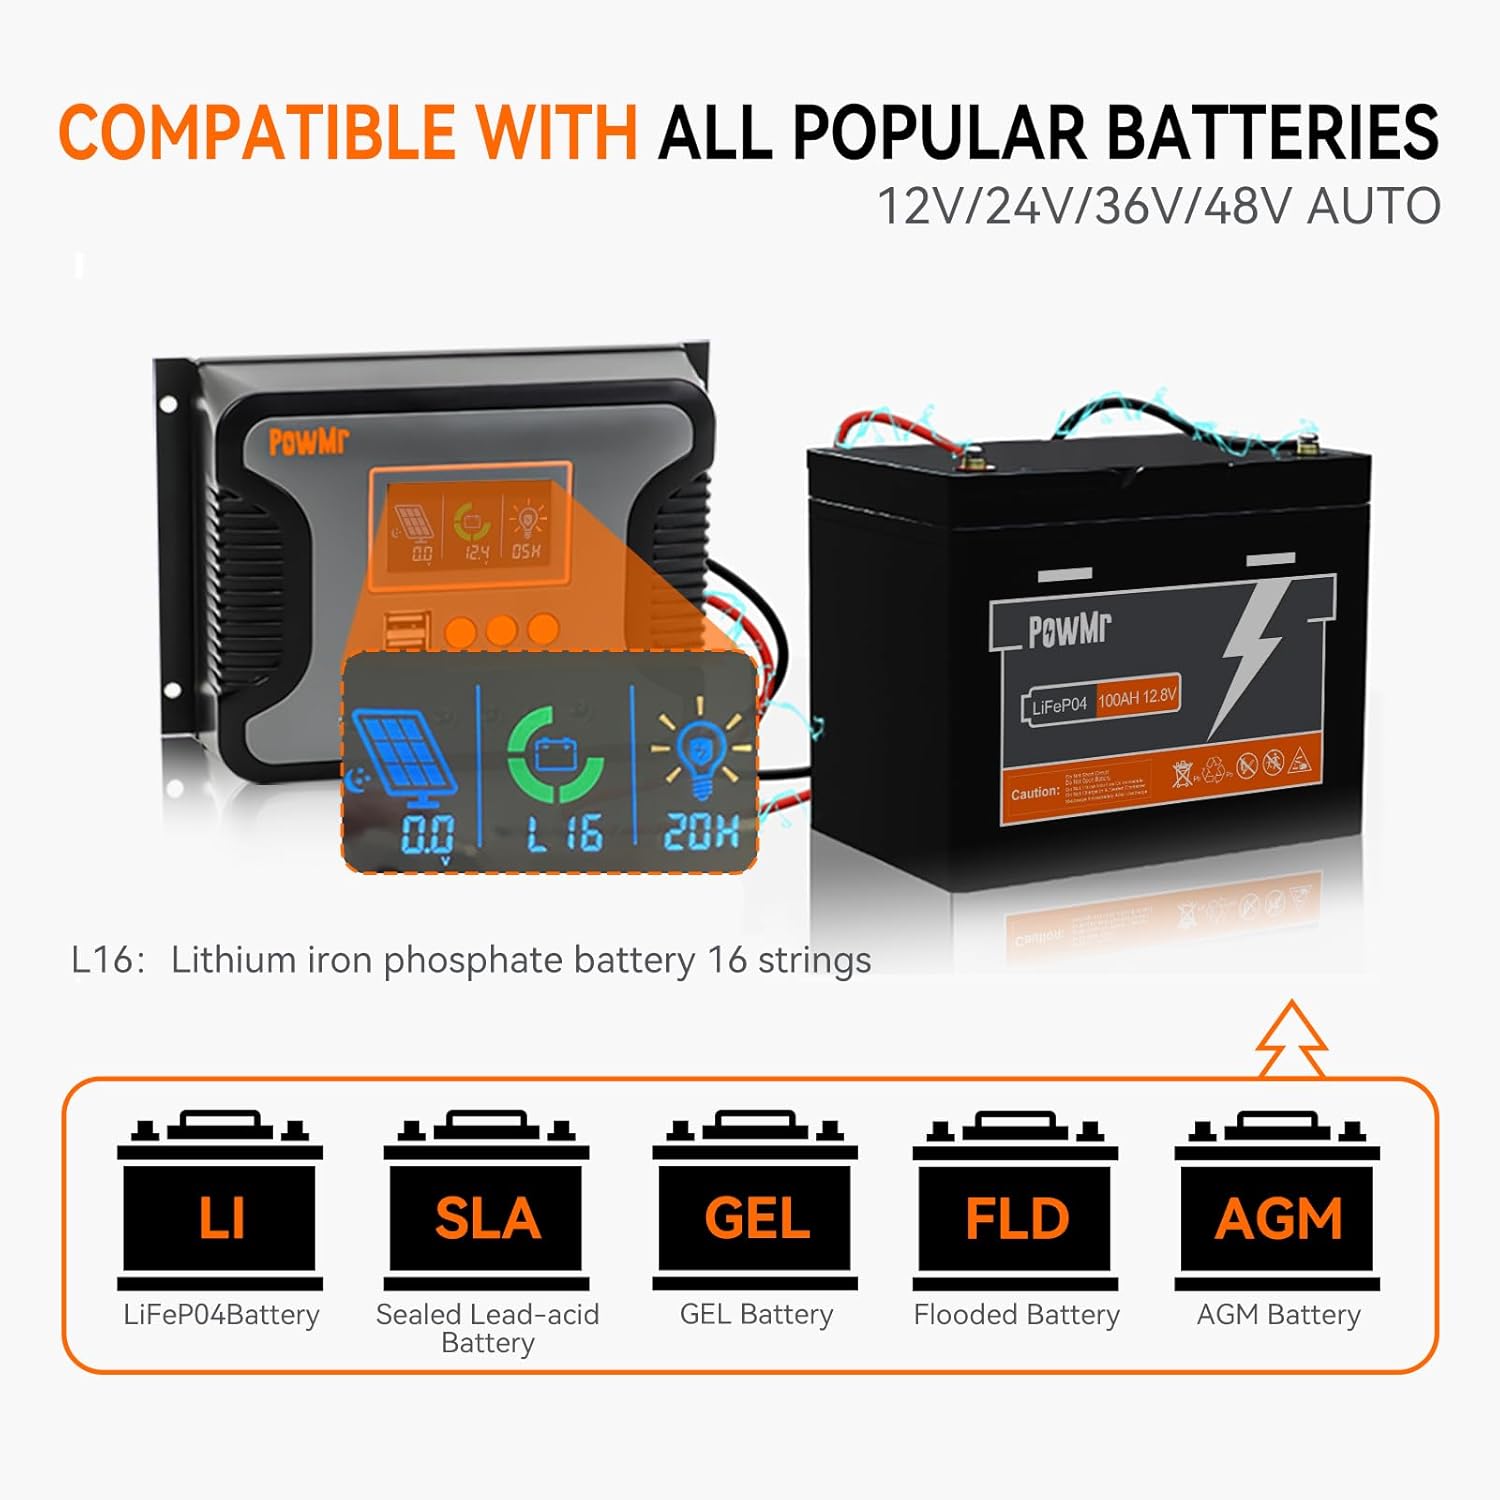
- Plaša akumulatoru saderība: Compatible with Sealed, LiFePO4, Gel, Flooded, and Lithium batteries.
- Dubultā USB izeja: Provides 5V/2.5A (max) for charging mobile devices.
- Vairākas aizsardzības: Includes protection against overheating, short circuits, over-discharging, reverse polarity, and overcurrent.
- LCD displejs: Real-time monitoring of charging current, generated energy, temperature, and battery voltage.

3.3. attēls: Illustration of the controller's compatibility with different battery types, including Lithium Iron Phosphate (LiFePO4), Sealed Lead-Acid (SLA), GEL, Flooded (FLD), and AGM batteries.
3.4. attēls: Visual representation of the comprehensive protection features integrated into the controller, ensuring safe operation and longevity of the system components.
4. Tehniskās specifikācijas
| Funkcija | Specifikācija |
|---|---|
| Modelis | 80A |
| Nominālā sistēma Voltage | 12V/24V/36V/48V Auto |
| Max. PV Input Open Circuit Voltage | 100V |
| Max. PV Input Power (12V Battery) | 960W |
| Max. PV Input Power (24V Battery) | 1920W |
| Max. PV Input Power (36V Battery) | 2880W |
| Max. PV Input Power (48V Battery) | 3840W |
| Nominālā uzlādes strāva | 80A |
| Nominālā līdzstrāvas izejas strāva | 50A |
| Uzlādes tehnoloģija | PWM (3-Stagir) |
| USB interfeiss | Dual USB output 5V/2.5A (max) |
| Darba temperatūras diapazons | -20°C ~ +55°C |
| Preces svars | 0.7 kg (1.54 mārciņas) |
| Displeja veids | LCD |
5. Uzstādīšana
Proper installation is crucial for the safe and efficient operation of your solar charge controller. Follow these steps carefully:
5.1 Kontrollera uzstādīšana
- Choose a suitable location: Ensure it is dry, well-ventilated, and protected from direct sunlight and moisture.
- Secure the controller to a wall or mounting surface using four screws.
5.1. video: Quick installation video for PowMr Pstar-80A solar controller. This video demonstrates the physical mounting of the controller and the correct wiring sequence.
5.2 Elektroinstalācijas savienojumi
Svarīgi: Always connect the battery first, then the solar panel, and finally the load. Disconnect in the reverse order (load, then solar panel, then battery).
- Pievienojiet akumulatoru: Connect the positive and negative terminals of your battery to the corresponding battery terminals on the controller. Ensure correct polarity.
- Pievienojiet saules paneli: Connect the positive and negative terminals of your solar panel(s) to the corresponding PV input terminals on the controller. Ensure correct polarity.
- Pievienojiet līdzstrāvas slodzi (pēc izvēles): If using a DC load directly from the controller, connect its positive and negative terminals to the load terminals on the controller.
- Ieslēgšana: Close the battery circuit breaker to power on the controller.

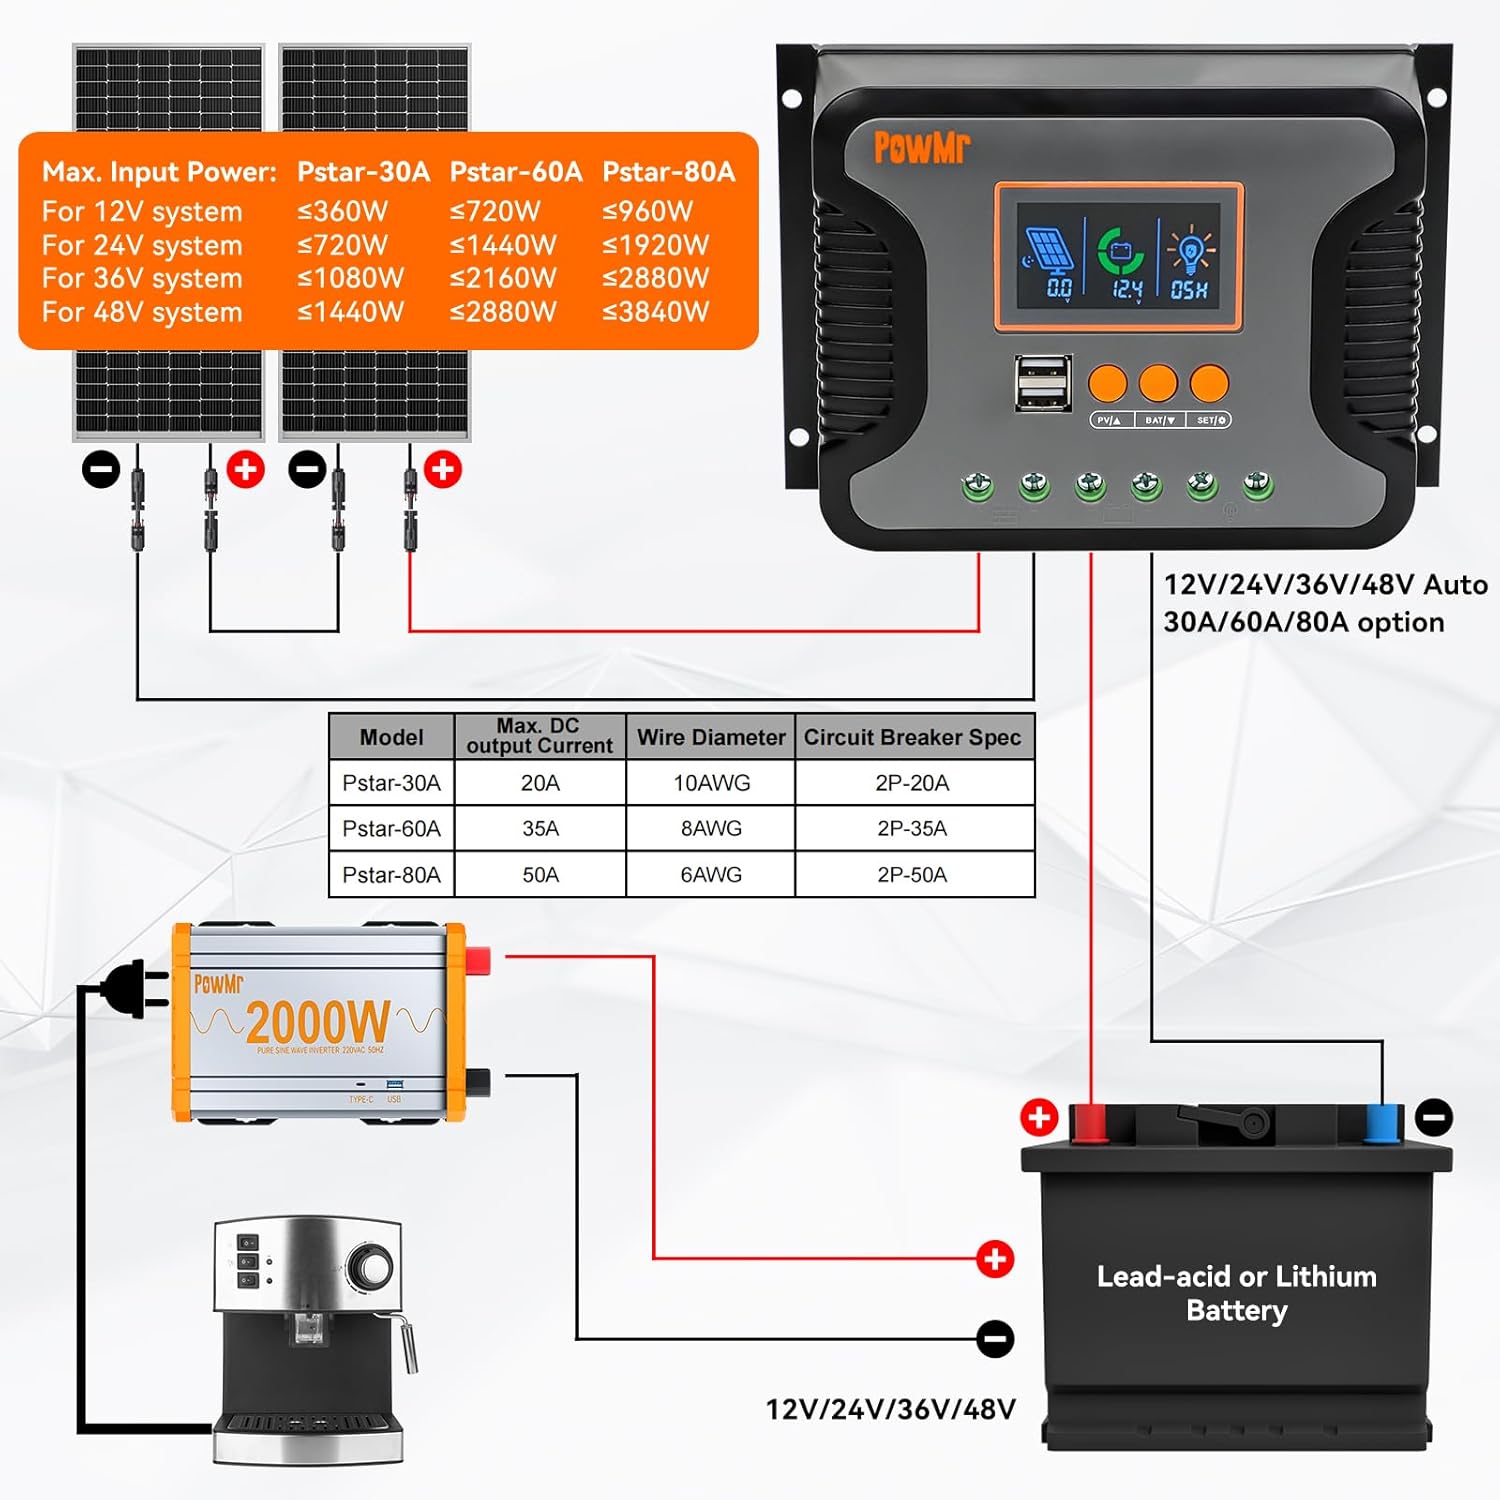
5.1. attēls: Comprehensive wiring diagram illustrating the connection points for solar panels, battery, and DC load. It also provides a table with recommended wire diameters and circuit breaker specifications for different models (Pstar-30A, Pstar-60A, Pstar-80A).
5.2. attēls: A simplified two-step connection guide, emphasizing the correct sequence of connecting the battery first (Step 1) and then the solar panels (Step 2) to the charge controller.
6. Darbība
The controller features an LCD display and three buttons for easy monitoring and parameter adjustment.
6.1 LCD displejs un pogas
The LCD displays real-time system information such as solar panel voltage, akumulatora tilptage, charging current, and load status. The three buttons (PV/A, BAT/V, SET/↓) are used for navigating menus and adjusting settings.
- PV/A Button: Short press to cycle through solar panel related displays (e.g., PV voltage, charging current).
- BAT/V Button: Short press to cycle through battery related displays (e.g., battery voltage, battery type).
- SET/↓ Button: Short press to enter or exit setting mode, or to decrease a value during setting. Long press to save settings.
6.2 Akumulatora tipa iestatīšana
To optimize charging, select the correct battery type:
- Nospiediet pogu BAT/V button until the battery type icon flashes on the LCD.
- Izmantojiet PV/A un SET/↓ buttons to cycle through available battery types (e.g., SEL for Sealed, FLD for Flooded, GEL for Gel, Li for Lithium).
- Once the desired battery type is displayed, long press the SET/↓ pogu, lai apstiprinātu un saglabātu iestatījumu.
The controller will automatically return to the default display screen if no button is pressed for 100 seconds.
7. Apkope
Regulāra apkope nodrošina jūsu saules uzlādes regulatora ilgmūžību un optimālu veiktspēju:
- Periodiski pārbaudiet visus vadu savienojumus, vai tie nav cieši pieguļoši un nav korozijas.
- Clean the controller's exterior with a dry cloth to remove dust and debris.
- Ensure the ventilation fins are clear of obstructions to allow for proper heat dissipation.
- Uzraugiet LCD displeju, vai tajā nav redzami kļūdu kodi vai neparasti rādījumi.
8. Traucējummeklēšana
If you encounter issues with your PowMr 80A Solar Charge Controller, refer to the following common problems and solutions:
| Problēma | Iespējamais cēlonis | Risinājums |
|---|---|---|
| Kontrolieris neieslēdzas | Akumulators nav pievienots vai zems spriegumstage; apgrieztā polaritāte. | Pārbaudiet akumulatora savienojumus un tilpumutage. Nodrošiniet pareizu polaritāti. |
| Nav uzlādes no saules paneļiem | Solar panels not connected; insufficient sunlight; PV voltage pārāk zems. | Verify solar panel connections. Check for shading. Ensure PV voltage is above battery voltage. |
| Ielāde nedarbojas | Load not connected; battery voltage too low; overload protection activated. | Check load connections. Charge battery. Reduce load or check for short circuits. |
| Neprecīzs sējtage rādījumi | Loose connections; incorrect battery type setting. | Tighten all connections. Verify the correct battery type is selected in settings. |
9. Garantija un atbalsts
The PowMr 80A Solar Charge Controller comes with a standard manufacturer's warranty. For specific warranty terms, please refer to the warranty card included in your product packaging or contact Temank customer support.
For technical assistance, troubleshooting beyond this manual, or to inquire about replacement parts, please contact Temank customer service through their official webvietni vai pirkuma laikā sniegto kontaktinformāciju.