1. Ievads
Thank you for choosing the Voltcraft VC-11 Digital Multimeter. This portable, Category III, 250V multimeter with a 2000-count display is designed for accurate electrical measurements in various applications. This manual provides essential information for safe operation, proper use, and maintenance of your device. Please read it thoroughly before use and keep it for future reference.
2. Drošības informācija
WARNING: Electrical shock hazard. Improper use of this meter can cause damage, shock, injury, or death. Read and understand this manual before operating the meter.
- Always ensure the meter is in good working condition and the test leads are not damaged.
- Nelietojiet vairāk par nominālo tilpumutage, as marked on the meter, between terminals or between any terminal and ground.
- Ievērojiet īpašu piesardzību, strādājot ar voltages above 25V AC RMS or 35V DC. These voltagtas rada trieciena risku.
- Pirms funkciju vai diapazonu maiņas vienmēr atvienojiet testa vadus no ķēdes.
- Do not operate the meter with the battery cover removed or loosened.
- Adhere to local and national safety codes. Use personal protective equipment (PPE) such as approved safety glasses and electrically insulated gloves.
3. Produkts beidziesview
The Voltcraft VC-11 is a compact digital multimeter featuring a clear LCD display, a rotary function switch, and input jacks for test leads. It is designed for measuring DC/AC voltage, DC current, resistance, and includes diode and continuity test functions.
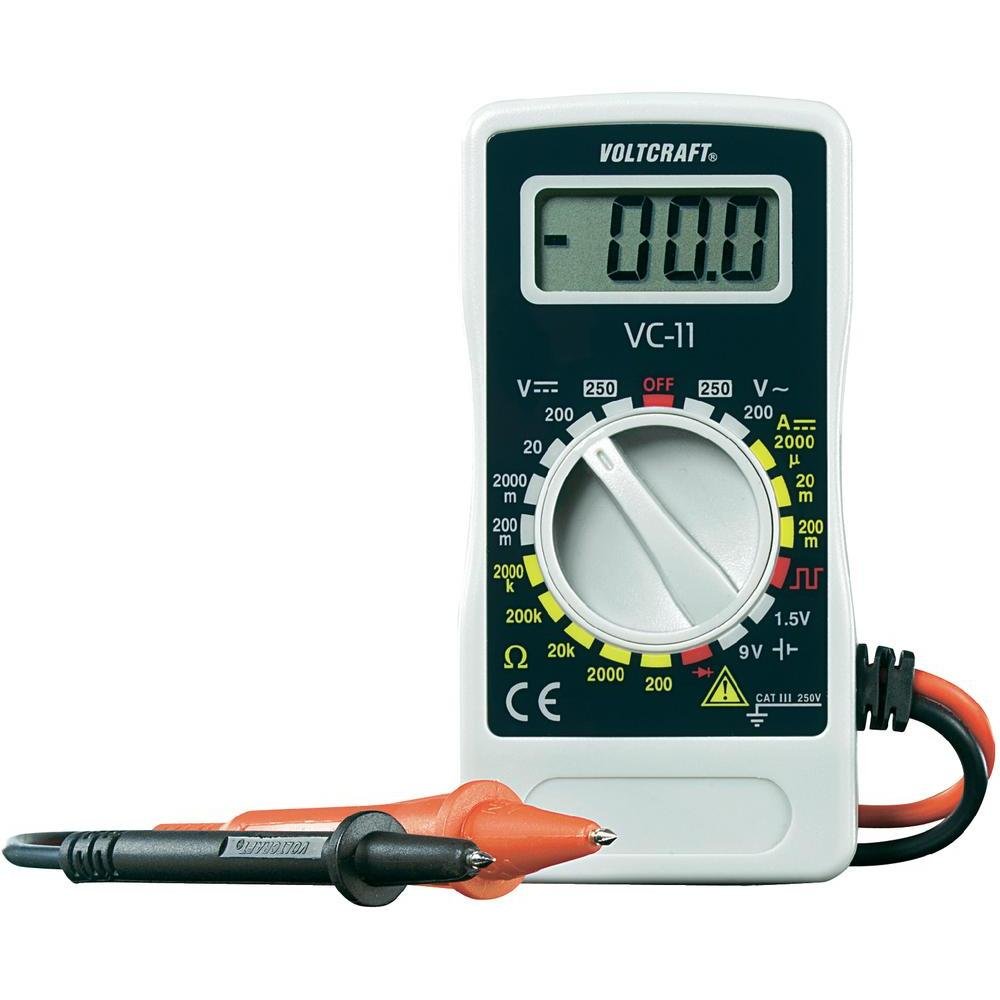
1. attēls. Priekšpuse view of the Voltcraft VC-11 Digital Multimeter with test leads connected. This image shows the LCD display, rotary switch, and input terminals.

2. attēls: Leņķis view of the Voltcraft VC-11 Digital Multimeter, highlighting the compact design and the CE marking.

Figure 3: The Voltcraft VC-11 Digital Multimeter shown with its test leads detached, illustrating the input ports.
3.1 Sastāvdaļas
- LCD displejs: Rāda mērījumu rādījumus, mērvienības un funkciju indikatorus.
- Rotējošais slēdzis: Izmanto, lai izvēlētos mērīšanas funkcijas un diapazonus.
- Ievades ligzdas: Ports for connecting the test leads (COM, VΩmA).
- Testa vadi: Red and black leads for connecting to the circuit under test.
4. Iestatīšana
4.1 Akumulatora uzstādīšana
The Voltcraft VC-11 requires a 9V battery for operation (not included). To install or replace the battery:
- Pārliecinieties, vai multimetrs ir izslēgts, un atvienojiet visus testa vadus.
- Atrodiet bateriju nodalījuma vāciņu mērierīces aizmugurē.
- Izmantojiet skrūvgriezi, lai atskrūvētu skrūvi, kas nostiprina akumulatora vāciņu.
- Uzmanīgi noņemiet vāku.
- Pievienojiet akumulatora spailei jaunu 9 V bateriju, ievērojot pareizo polaritāti.
- Place the battery into the compartment and replace the cover, securing it with the screw.
4.2 Testa vadu pievienošana
Always connect the black test lead to the 'COM' (common) jack. Connect the red test lead to the appropriate input jack based on the desired measurement:
- Sējtage (V), Resistance (Ω), Diode, and Continuity measurements, connect the red lead to the 'VΩmA' jack.
- For Current (A) measurements, connect the red lead to the 'VΩmA' jack (for mA range).
5. Lietošanas instrukcijas
Before taking any measurement, ensure the test leads are correctly connected and the rotary switch is set to the desired function and range.
5.1. Līdzstrāvas mērīšana Voltage (V=)
- Iestatiet rotācijas slēdzi uz vēlamo līdzstrāvas tilpumu.tage (V=) range (e.g., 200mV, 2V, 20V, 200V, 250V). If the voltagJa e nav zināms, sāciet ar augstāko diapazonu un samaziniet pēc nepieciešamības.
- Connect the black test lead to the 'COM' jack and the red test lead to the 'VΩmA' jack.
- Connect the test probes in parallel across the component or circuit to be measured.
- Izlasiet sējtage vērtība LCD displejā.
5.2. Maiņstrāvas mērīšana Voltage (V~)
- Iestatiet rotācijas slēdzi uz vēlamo maiņstrāvas skaļumu.tage (V~) diapazons (piemēram, 200 V, 250 V).
- Connect the black test lead to the 'COM' jack and the red test lead to the 'VΩmA' jack.
- Connect the test probes in parallel across the AC source or component.
- Izlasiet sējtage vērtība LCD displejā.
5.3 Measuring DC Current (A=)
- Set the rotary switch to the desired DC Current (A=) range (e.g., 2000µA, 20mA, 200mA).
- Connect the black test lead to the 'COM' jack and the red test lead to the 'VΩmA' jack.
- BRĪDINĀJUMS: To measure current, the meter must be connected in series with the circuit. Break the circuit and insert the meter.
- Connect the test probes in series with the circuit.
- Izlasiet pašreizējo vērtību LCD displejā.
5.4 Pretestības (Ω) mērīšana
- Pirms pretestības mērīšanas pārliecinieties, vai ķēde ir atslēgta no strāvas.
- Set the rotary switch to the desired Resistance (Ω) range (e.g., 200Ω, 2kΩ, 20kΩ, 200kΩ, 2000kΩ).
- Connect the black test lead to the 'COM' jack and the red test lead to the 'VΩmA' jack.
- Pievienojiet testa zondes mērāmajai detaļai.
- Nolasiet pretestības vērtību LCD displejā.
5.5. Diodes tests
- Pārliecinieties, ka ķēde ir atvienota no strāvas.
- Set the rotary switch to the Diode symbol (usually next to resistance).
- Connect the black test lead to the 'COM' jack and the red test lead to the 'VΩmA' jack.
- Pievienojiet sarkano zondi diodes anodam un melno zondi diodes katodam. Displejā tiks parādīts tiešais spriegums.tage piliens.
- Reverse the probes. The display should show 'OL' (Overload) for a good diode.
5.6. Nepārtrauktības pārbaude
- Pārliecinieties, ka ķēde ir atvienota no strāvas.
- Set the rotary switch to the Continuity symbol (usually next to diode/resistance).
- Connect the black test lead to the 'COM' jack and the red test lead to the 'VΩmA' jack.
- Pievienojiet testa zondes ķēdei vai komponentam.
- If the resistance is below a certain threshold (typically 30-50Ω), the meter will emit an audible beep, indicating continuity.
6. Apkope
6.1. Tīrīšana
Noslaukiet skaitītāju ar reklāmuamp drānu un maigu mazgāšanas līdzekli. Nelietojiet abrazīvus līdzekļus vai šķīdinātājus. Pirms lietošanas pārliecinieties, vai mērierīce ir pilnībā sausa.
6.2. Akumulatora nomaiņa
When the battery symbol appears on the LCD display, the 9V battery needs to be replaced. Refer to section 4.1 for battery installation instructions.
7. Traucējummeklēšana
| Problēma | Iespējamais cēlonis | Risinājums |
|---|---|---|
| Nav displeja vai blāvs displejs | Izlādējies vai zems akumulators | Nomainiet 9V akumulatoru. |
| Nepareizi rādījumi | Incorrect function/range selected Poor test lead connection Damaged test leads | Select the correct function and range. Ensure test leads are firmly connected. Inspect and replace damaged test leads. |
| Tiek parādīts "OL" (pārslodze) | Measurement exceeds selected range Open circuit (for resistance/current) | Select a higher range. Check for breaks in the circuit. |
8. Specifikācijas
- Zīmols: VOLTCRAFT
- Modeļa numurs: VC11
- Ražotājs: VOLTCRAFT
- Produkta svars: Approximately 9.07 g (without packaging)
- Iepakojuma izmēri: 14.8 x 8 x 3.6 cm
- Kategorijas vērtējums: CAT III 250V
- Displejs: 2000 skaitās
- Barošanas avots: 9 V baterija (nav iekļauta komplektā)
9. Informācija par garantiju
This product is covered by a standard manufacturer's warranty. Please refer to the warranty card included with your purchase or contact your retailer for specific terms and conditions. The warranty typically covers defects in materials and workmanship under normal use.
10. Klientu atbalsts
For technical assistance, troubleshooting, or service inquiries, please contact Voltcraft customer support or your local distributor. Contact information can usually be found on the manufacturer's webvietnē vai uz produkta iepakojuma.


