1. Ievads
The PAC RadioPRO4 Radio Replacement Interface RP4-FD11 is designed to integrate an aftermarket radio into select Ford vehicles while retaining factory features such as steering wheel controls (SWC) and providing data-controlled accessory and navigation outputs. This interface ensures seamless communication between your new radio and the vehicle's computer system.
The RP4-FD11 is compatible with select Ford vehicles. Please refer to the vehicle compatibility list in the full product documentation for specific models and years.
2. Iepakojuma saturs
- Interfeisa modulis
- Stūres vadības siksna
- Saskarnes vadi
- Instrukciju buklets

Figure 1: The package includes the main interface module, various wiring harnesses for vehicle integration, and a detailed instruction booklet.
3. Wiring Connection Chart
Refer to the chart below for detailed wiring connections. Match the wire colors from the PAC interface to your aftermarket radio and vehicle harness.
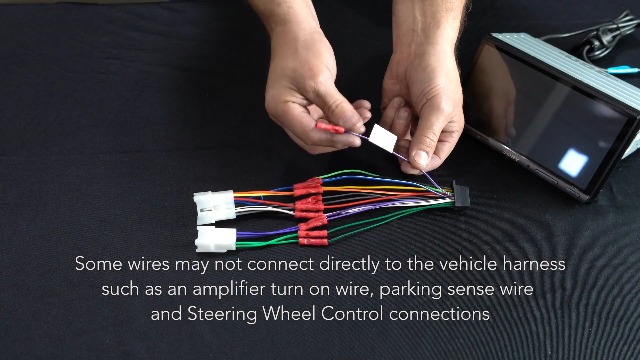
Figure 2: This chart details the color-coded wiring connections for the PAC RadioPRO4 interface, showing connections for power, ground, speaker outputs, and accessory functions.
| Interfeisa savienotājs | Funkcija | Transportlīdzekļa savienotājs | Funkcija |
|---|---|---|---|
| Sarkans/Balts | Stāvbremzes izeja (-) | Dzeltens | Akumulators +12V |
| Violeta/Balta | Vehicle Speed Output (VSS) | Melns | Zemējums |
| Zils/Balts | Amp Ieslēdziet ievadi | Zils | Antenna On Input |
| Sarkans | Papildierīču izvade (1 amp) | Balts | Front L + Input |
| Oranžs/Balts | Apgaismojuma jauda (+) | Balts/Melns | Front L - Input |
| Zaļš | Apgrieztā izeja (+) | Pelēks | Front R + Input |
| Pelēks/melns | Front R - Input | ||
| Zaļš | Aizmugurējais L + ieeja | ||
| Zaļš/Melns | Rear L - Input | ||
| Violeta | Rear R + Input | ||
| Violeta/melna | Rear R - Input |
4. Uzstādīšanas soļi
- Atvienojiet akumulatoru: Disconnect the negative battery terminal before beginning installation to prevent electrical shorts.
- Noņemiet rūpnīcas radio: Carefully remove the factory radio from the vehicle dashboard. This may require specialized tools and careful prying to avoid damaging the dashboard or trim pieces.
- Connect Interface Harness: Connect the PAC RP4-FD11 interface harness to the aftermarket radio's harness, matching wire colors according to the provided wiring chart.
- Pievienojiet transportlīdzekļa instalāciju: Connect the vehicle-specific harness to the PAC interface module.
- Droši komponenti: Secure the aftermarket radio and PAC interface module in the dashboard, ensuring all connections are tucked away safely.
- Atkārtoti pievienojiet akumulatoru: Atkārtoti pievienojiet akumulatora negatīvo spaili.
- Testa funkcijas: Turn the vehicle ignition to the ACC or ON position (do not start the engine) and test all radio and steering wheel control functions.
Video 1: This video demonstrates the general installation process for a factory stereo replacement interface, including wiring connections and mounting.
Video 2: This video provides a detailed walkthrough of splicing and programming a PAC RadioPRO4 interface for an aftermarket Joying head unit, showcasing wiring connections.
5. Steering Wheel Control Programming
The RP4-FD11 interface comes pre-programmed for most factory SWC functions. If re-assignment or custom programming is desired, follow these steps:
- Ieslēgta aizdedze: Turn the key to the ignition position (ACC or ON, but do not start the vehicle).
- Press Program Button: Press and release the programming button on the side of the interface module.
- Program SWC Button: Within 7 seconds, press the button on the steering wheel that you wish to program. The LED on the interface will turn off when the button is pressed.
- Short Press Functionality: For a short press function, release the steering wheel button within 1.5 seconds. The LED will turn back on.
- Ilgstošas nospiešanas funkcionalitāte: For a long press function, hold the steering wheel button until the LED starts blinking. Release the button, and the LED will go back to solid.
- Repeat for More Buttons: Ja nepieciešams ieprogrammēt vairāk pogu, atkārtojiet 3. darbību katrai papildu audio funkcijai uz stūres.
- Skip Functions: If a function in the chart is not present on your steering wheel, or you do not wish to program it, press and release the program button on the side of the interface to skip that function.
- Pilnīga programmēšana: Once all desired functions are programmed (or skipped), wait seven seconds. The LED will flash three times, indicating the end of programming.
- Testa funkcionalitāte: Test the interface for proper functionality. Whenever a SWC button is pressed, the LED on the interface should blink. If any function does not work, repeat the programming steps.
Video 3: This video provides a technical tip on how to manually program the Axxess ASWC-1 steering wheel control interface, detailing button presses and LED feedback.
Video 4: This video demonstrates the remapping process for the Axxess ASWC-1 steering wheel control interface, showing how to assign custom functions to vehicle buttons.
6. Svarīgas piezīmes un saderība
- Rūpnīca Amplified Systems: Rūpnīca amplified systems will not fade as neither the aftermarket radio nor the RP interface can control the ampLifier's Fader.
- 2008 F-250/350/450 Compatibility: Not compatible with model trim XL (fleet vehicles). These vehicles do not have the necessary CAN bus signals.
- 2006-2007 Ford Freestyle: Does not retain Rear Seat Entertainment (RSE).
- 2006 Lincoln Zephyr: Does not retain the THX ampdzīvāks.
7. Specifikācijas
- Preces svars: 3.52 unces
- Produkta izmēri: 9 x 9 x 2 collas
- Preces modeļa numurs: RP4-FD11
- Ražotājs pārtrauc: Jā
- Garantija: 1 gadu ražotājs
- Height (inches): 8 collas
- Datums, kad pirmais pieejams: 27. gada 2012. janvāris
8. Traucējummeklēšana
- Steering Wheel Controls Not Working Correctly: If steering wheel controls are reversed (e.g., volume down acts as volume up), ensure the interface is correctly programmed for your specific radio model. Refer to the 'Steering Wheel Control Programming' section and the radio selection switch settings.
- No Audio or Incorrect Fading with Factory Amplified Systems: As noted in the important notes, factory amplified systems may not support fading control through the aftermarket radio or RP interface. Verify all speaker connections are secure.
- Nav strāvas pēcpārdošanas radio: Check all power and ground connections. Ensure the accessory output (red wire) is correctly connected and receiving power.
- Problēmas ar rezerves kameru: Verify the reverse output (green wire) from the interface is correctly connected to the aftermarket radio's reverse trigger input. Ensure the camera itself is properly powered and connected.
9. Garantija un atbalsts
This PAC product is covered by a 1-Year Manufacturer Warranty. For technical support or warranty claims, please refer to the contact information provided in your product packaging or visit the official PAC webvietne.


