1. Ievads
This manual provides comprehensive instructions for the installation, operation, and maintenance of the Supermicro X10SLM+-LN4F motherboard. Designed for server applications, this motherboard features an LGA1150 socket, Intel C224 PCH, DDR3 memory support, and multiple Gigabit Ethernet ports. Please read this manual thoroughly before proceeding with installation to ensure proper setup and optimal performance.
2. Produkts beidziesview
The Supermicro X10SLM+-LN4F is a microATX server motherboard built for reliability and performance. Key features include:
- LGA1150 Socket for Intel Xeon E3-1200 v3/v4 and 4th Gen Core i3 processors.
- Intel C224 PCH chipset.
- Four DDR3 DIMM slots supporting up to 64GB ECC/non-ECC UDIMM.
- Multiple SATA3 (6Gbps) ports.
- Integrated quad Gigabit Ethernet ports.
- USB 3.0 and USB 2.0 support.
- VGA output for integrated graphics.
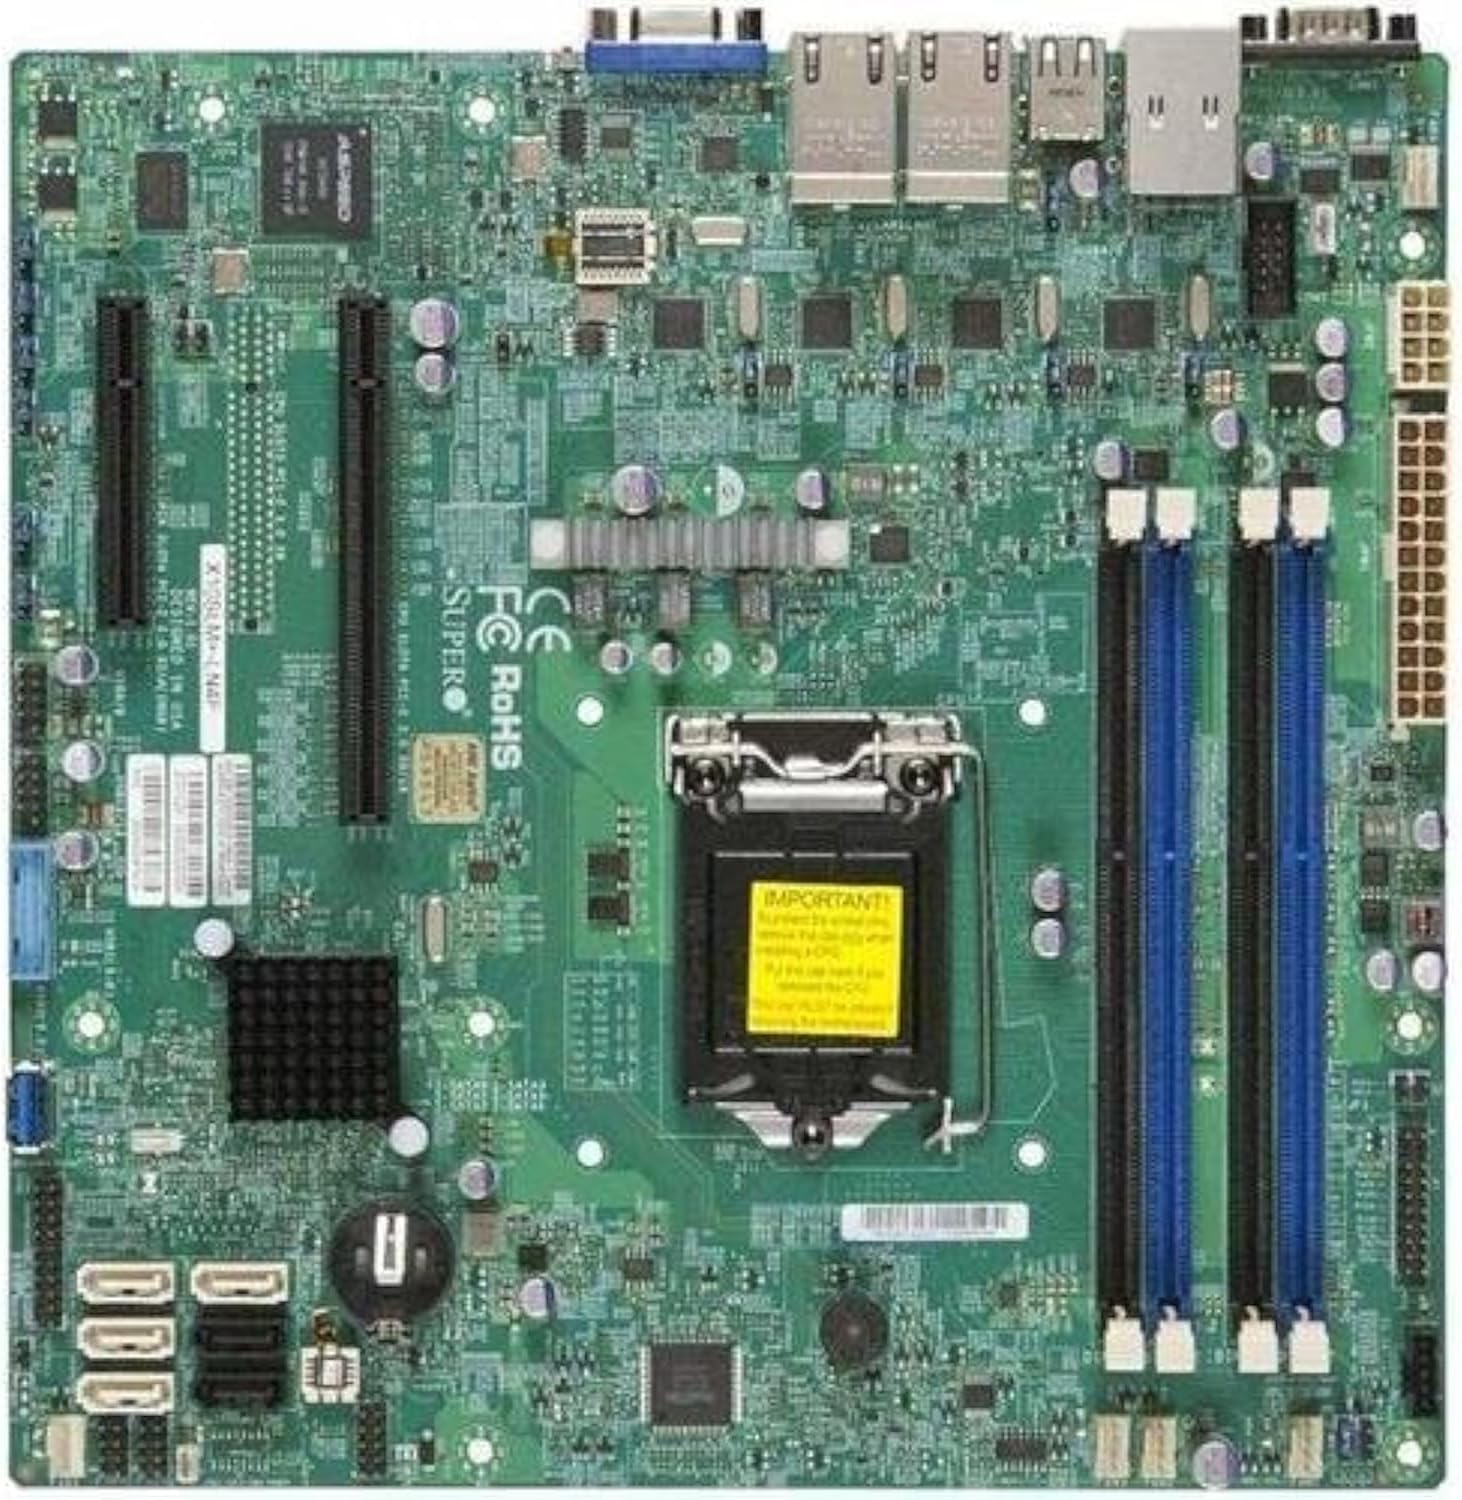
2.1. attēls: No augšas uz leju view of the Supermicro X10SLM+-LN4F motherboard, showing the CPU socket, DIMM slots, PCIe slots, and various connectors.

2.2. attēls: Leņķveida view of the motherboard, highlighting the layout of components and expansion slots.
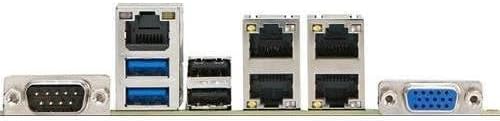
2.3. attēls: Rear I/O panel of the Supermicro X10SLM+-LN4F motherboard, featuring multiple LAN ports, USB ports, and serial ports.
3. Iestatīšana un instalēšana
Pirms instalēšanas sākšanas pārliecinieties, vai sistēma ir izslēgta un atvienota no barošanas avota. Valkājiet antistatisku aproci, lai novērstu elektrostatiskās izlādes (ESD) radītus bojājumus komponentiem.
3.1. Centrālā procesora instalēšana
- Atrodiet LGA1150 procesora ligzdu uz mātesplates.
- Viegli nospiediet ielādes sviru uz leju un pavelciet to uz sāniem, lai atvērtu procesora ligzdas fiksācijas rāmi.
- Uzmanīgi izlīdziniet centrālā procesora trīsstūrveida atzīmi ar atbilstošo atzīmi uz ligzdas.
- Ievietojiet centrālo procesoru ligzdā, to nepiespiežot.
- Aizveriet stiprinājuma rāmi un nostipriniet to ar slodzes sviru.
- Uzklājiet plānu, vienmērīgu termopastas kārtu uz centrālā procesora integrētā siltuma izkliedētāja (IHS).
- Uzstādiet procesora dzesētāju saskaņā ar ražotāja norādījumiem.
3.2. Atmiņas (RAM) instalēšana
- Locate the four DDR3 DIMM slots. For optimal performance, refer to the motherboard's specific memory population guidelines, typically starting with slots closest to the CPU or specific colored slots for dual-channel configurations.
- Atveriet fiksācijas skavas abos DIMM slota galos.
- Novietojiet DDR3 atmiņas moduļa iecirtumu ar atslēgu DIMM slotā.
- Insert the memory module firmly into the slot until the retention clips snap into place.
- Ensure both clips are fully closed and the module is seated correctly.
3.3. Krātuves ierīces instalēšana
Connect SATA storage devices (HDDs/SSDs) to the SATA ports on the motherboard using SATA data cables. Connect the power cables from your power supply unit (PSU) to the storage devices.
3.4. Paplašināšanas kartes uzstādīšana
This motherboard features PCI Express (PCIe) slots. To install an expansion card:
- Remove the corresponding slot cover from your chassis.
- Novietojiet paplašināšanas karti ar PCIe slotu.
- Stingri spiediet uz leju, līdz karte ir pilnībā ievietota slotā.
- Secure the card with a screw or retention clip from your chassis.
3.5. Barošanas savienojumi
- 24 kontaktu ATX barošanas savienotājs: Connect the main 24-pin power cable from your PSU to the ATX power connector on the motherboard.
- 8-pin EPS/CPU Power Connector: Connect the 8-pin (or 4+4 pin) CPU power cable from your PSU to the EPS connector near the CPU socket.
3.6. Priekšējā paneļa un aizmugurējie I/O savienojumi
- Priekšējā paneļa savienotāji: Connect the power switch, reset switch, power LED, and HDD activity LED cables from your chassis to the corresponding pins on the motherboard's front panel header. Refer to the motherboard's silkscreen labels for correct orientation.
- USB galvenes: Connect front panel USB ports to the onboard USB headers.
- Audio Headers: Connect front panel audio jacks to the onboard audio header.
- Aizmugurējais I/O panelis: Connect peripherals such as keyboard, mouse, monitor (via VGA), and network cables (to the Gigabit Ethernet ports) to the rear I/O panel.
4. Lietošanas instrukcijas
4.1. Initial Power On and BIOS/UEFI Setup
- After all components are installed and connected, connect the power cord to the PSU and turn on the power switch on the PSU.
- Press the power button on your chassis.
- Ieslēgšanas pašpārbaudes (POST) laikā atkārtoti nospiediet pogu DEL or F2 key (or as indicated on screen) to enter the BIOS/UEFI setup utility.
- In the BIOS/UEFI, configure essential settings such as date and time, boot order, and enable/disable specific features as required for your operating system and hardware.
- Saglabājiet izmaiņas un izejiet no BIOS/UEFI. Sistēma tiks restartēta.
4.2. Operētājsistēmas instalēšana
To install an operating system (e.g., Windows, Linux, VMware ESXi):
- Insert the operating system installation media (USB drive or DVD) into the system.
- Boot from the installation media (you may need to adjust the boot order in BIOS/UEFI).
- Follow the on-screen prompts to install the operating system on your chosen storage device.
- After installation, install all necessary drivers for the motherboard components (chipset, LAN, VGA, etc.) from the Supermicro website or the provided driver disc.
5. Apkope
Regulāra apkope palīdz nodrošināt jūsu mātesplates un sistēmas ilgmūžību un stabilu darbību.
5.1. Tīrīšana
- Periodically clean dust from the motherboard and system components using compressed air. Ensure the system is powered off and unplugged before cleaning.
- Izvairieties no šķidru tīrīšanas līdzekļu lietošanas tieši uz detaļām.
- Ensure proper airflow within the chassis by keeping fan vents clear.
5.2. Firmware and Driver Updates
- Pārbaudiet Supermicro website periodically for updated BIOS/UEFI firmware and drivers for your motherboard model.
- Follow the provided instructions carefully when updating firmware to avoid system instability.
5.3. Vides apsvērumi
- Operate the motherboard within recommended temperature and humidity ranges to prevent damage.
- Ensure adequate ventilation in the server chassis.
6. Traucējummeklēšana
Šajā sadaļā ir sniegti risinājumi bieži sastopamām problēmām, ar kurām jūs varētu saskarties.
6.1. Nav strāvas padeves / Nav POST (ieslēgšanas pašpārbaudes)
- Verify that the power supply unit (PSU) is connected correctly to the motherboard (24-pin ATX and 8-pin EPS connectors).
- Ensure the PSU is switched on and receiving power from the wall outlet.
- Pārbaudiet, vai priekšējā paneļa barošanas slēdža kabelis ir pareizi pievienots mātesplates savienotājam.
- Reseat the CPU, RAM modules, and any expansion cards.
- Mēģiniet startēt datoru, izmantojot tikai svarīgākos komponentus (centrālo procesoru, vienu RAM atmiņas karti, procesora dzesētāju), lai noteiktu problēmas cēloni.
- Listen for beep codes from the system speaker, which can indicate specific hardware failures. Refer to the Supermicro website for beep code interpretations.
6.2. Displeja problēmas
- Ensure the monitor is properly connected to the motherboard's VGA port.
- Pārliecinieties, vai monitors ir ieslēgts un iestatīts pareizais ievades avots.
- If using a discrete graphics card, ensure it is properly seated and connected to power (if required).
6.3. Operētājsistēma netiek palaista
- Check the boot order in the BIOS/UEFI to ensure the correct storage device is prioritized.
- Verify that the operating system is installed correctly on the storage device.
- Ensure SATA data and power cables are securely connected to the storage device and motherboard.
7. Specifikācijas
Below are the technical specifications for the Supermicro X10SLM+-LN4F motherboard:
| Funkcija | Detaļas |
|---|---|
| Zīmols | Supermikro |
| Modeļa nosaukums | X10SLM+-LN4F-B |
| CPU ligzda | LGA1150 |
| Čipsetu tips | Intel C224 |
| RAM atmiņas tehnoloģija | DDR3 SDRAM |
| Atmiņas ātrums | 1600 MHz |
| Atmiņas krātuves ietilpība | Līdz 64 GB |
| USB 2.0 portu skaits | 2 (aizmugurējā I/O) |
| Grafikas kartes interfeiss | Integrated, PCI |
| Saderīgas ierīces | Serveris |
| Platforma | Windows 10 |
| Preces svars | 5.8 mārciņas |
| Produkta izmēri (LxWxH) | 10 x 10 x 2 collas |
| Datums pirmais pieejams | 4. gada 2013. jūnijs |
Note: Specifications are subject to change without notice. For the most current information, please refer to the official Supermicro product page.
8. Garantija un atbalsts
For detailed warranty information, please refer to the warranty card included with your product or visit the official Supermicro website. Technical support is available through Supermicro's customer service channels, including their support portal, email, and phone. Please have your product model number (X10SLM+-LN4F) and serial number ready when contacting support.
For the latest drivers, BIOS updates, and additional documentation, please visit: www.supermicro.com


