1. Ievads
Paldies par pirkumuasing the iTOMA CKS3501BT Radio Alarm Clock. This manual provides detailed instructions for setting up and operating your device. Please read it thoroughly before use to ensure proper functionality and to maximize your user experience.
Iepakojuma saturs:
- iTOMA CKS3501BT Radio Alarm Clock
- Strāvas adapteris
- FM vadu antena
- Lietotāja rokasgrāmata (šis dokuments)
2. Produkts beidziesview
Familiarize yourself with the controls and display of your iTOMA CKS3501BT Radio Alarm Clock.
Augšējā paneļa vadīklas:
- VOL- / VOL+: Adjust volume.
- IESTATĪT: Enter setup mode for time, date, and alarms.
- LAIKA ZONA: Adjust time zone.
- AL 1 / AL 2: Set Alarm 1 / Alarm 2.
- ATLIKT / DIMMER: Snooze active alarm; adjust display brightness.
- TUNE - / TUNE +: Tune FM radio frequency; navigate menu options.
- ATMIŅA: Save and recall FM radio presets.
- AVOTS: Select audio source (FM, Bluetooth, AUX).
- SPĒKS: Turn unit on/off.
Priekšējais displejs:
- 1.4-inch blue LED display for time, date, and status indicators.
- Indicators for Alarm 1, Alarm 2, FM frequency, Bluetooth status.

2.1. attēls. Priekšpuse view of the iTOMA CKS3501BT Radio Alarm Clock, showing the large blue LED display and top panel controls.
3. Iestatīšana
3.1. Sākotnējā ieslēgšana
- Pievienojiet strāvas adapteri ierīces aizmugurē esošajai DC IN ligzdai.
- Pievienojiet strāvas adapteri standarta sienas kontaktligzdai. Displejs iedegsies.
- The unit includes a pre-installed backup battery to maintain time and alarm settings during power outages.
3.2 Laika un datuma iestatīšana
- Ensure the unit is powered IZSLĒGTS (nospiediet SPĒKS button if display is on).
- Nospiediet un turiet IESTATĪT pogu, līdz displejā mirgo gads.
- Izmantojiet TUNE - / TUNE + buttons to adjust the year. Press IESTATĪT lai apstiprinātu.
- Repeat the process for Month, Day, Hour, and Minute.
- Pēc minūšu iestatīšanas nospiediet IESTATĪT lai apstiprinātu un izietu no laika iestatīšanas režīma.
3.3 Automātiska pāreja uz vasaras laiku (DST)
The unit is equipped with an Auto DST feature. To enable or disable:
- Ensure the unit is powered IZSLĒGTS.
- Nospiediet un turiet LAIKA ZONA button. The display will show "DST ON" or "DST OFF".
- Izmantojiet TUNE - / TUNE + buttons to toggle between "DST ON" and "DST OFF".
- Atlaidiet LAIKA ZONA pogu, lai apstiprinātu savu izvēli.
4. Lietošanas instrukcijas
4.1 Alarm Settings (Dual Alarm)
The CKS3501BT features two independent alarms (AL1 and AL2) that can be set to wake you with a buzzer or FM radio.
- Ensure the unit is powered IZSLĒGTS.
- Nospiediet un turiet kādu no AL 1 or AL 2 pogu, līdz mirgo modinātāja stundas rādījums.
- Izmantot TUNE - / TUNE + to adjust the hour. Press the respective AL pogu, lai apstiprinātu.
- Atkārtojiet minūtes.
- Next, select the alarm source: Use TUNE - / TUNE + to choose between "Buzzer" or "FM Radio". Press the AL pogu, lai apstiprinātu.
- If FM Radio is selected, use TUNE - / TUNE + to set the desired wake-up volume. Press the AL pogu, lai apstiprinātu.
- Finally, select the alarm schedule: Use TUNE - / TUNE + to choose "Every Day", "Weekdays", or "Weekends". Press the AL pogu, lai apstiprinātu un izietu no modinātāja iestatīšanas režīma.
Lai aktivizētu/deaktivizētu modinātāju, nospiediet atbilstošo AL 1 or AL 2 button briefly when the unit is powered IZSLĒGTS. The alarm indicator (1 or 2) will appear/disappear on the display.
4.2 Atlikšanas funkcija
Kad atskan modinātājs, nospiediet ATLIKT / DIMMER button to temporarily silence it for 9 minutes. The alarm will sound again after the snooze period.
4.3 Miega taimeris
The sleep timer allows you to fall asleep to FM radio or Bluetooth audio, which will automatically turn off after a set duration (10 to 90 minutes).
- While the unit is playing FM radio or Bluetooth audio, press the GULĒT button (often integrated with SNOOZE or another button, refer to device markings if different).
- Atkārtoti nospiediet GULĒT button to cycle through sleep timer options (e.g., 90, 80, 70... 10 minutes, OFF).
- Ierīce automātiski izslēgsies pēc izvēlētā laika.
4.4 FM radio darbība

Figure 4.1: The iTOMA CKS3501BT can receive FM radio signals, indicated by the radio icon and waves.
- Ensure the FM wire antenna is properly connected to the antenna jack on the back of the unit for optimal reception.
- Nospiediet pogu SPĒKS pogu, lai ieslēgtu ierīci.
- Nospiediet pogu AVOTS atkārtoti nospiediet pogu, līdz displejā parādās uzraksts “FM”.
- Manuāla regulēšana: Nospiediet TUNE - / TUNE + briefly to adjust the frequency step by step.
- Automātiskā skenēšana: Nospiediet un turiet TUNE - / TUNE + for a few seconds to automatically scan for the next available station.
4.5 Saving and Recalling FM Presets
The unit can store up to 10 FM radio stations as presets.
- Noskaņojieties uz vēlamo FM staciju.
- Nospiediet un turiet ATMIŅA button until "P01" (or the next available preset number) flashes on the display.
- Izmantot TUNE - / TUNE + to select the desired preset number (P01-P10).
- Nospiediet ATMIŅA vēlreiz, lai apstiprinātu un saglabātu staciju.
- Lai izsauktu iepriekš iestatītu staciju, īsi nospiediet ATMIŅA button repeatedly to cycle through the saved stations.
4.6 Bluetooth darbība
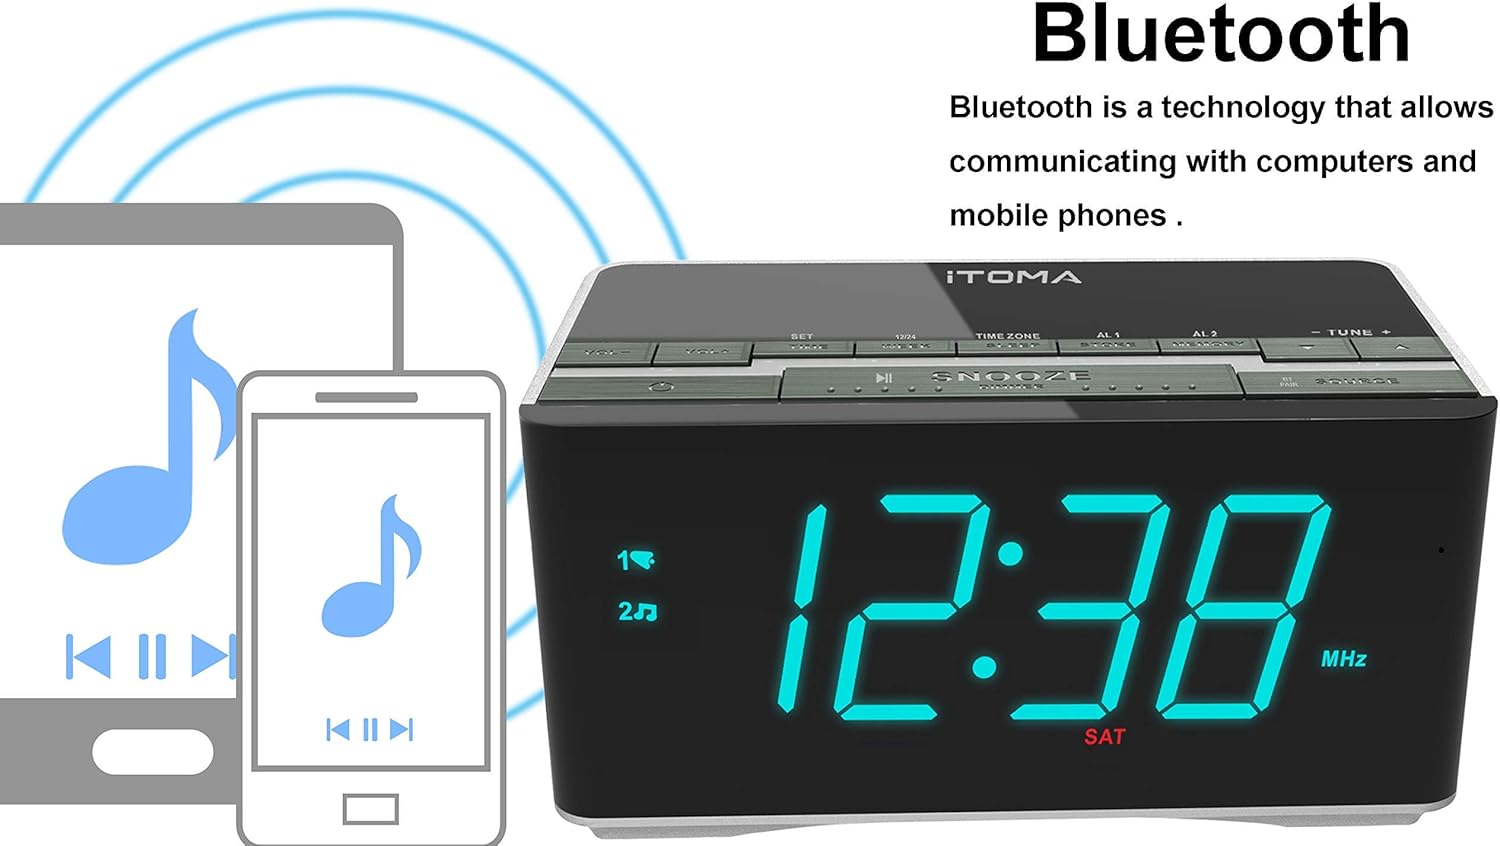
Figure 4.2: The iTOMA CKS3501BT supports Bluetooth connectivity for wireless audio streaming from compatible devices.
- Nospiediet pogu SPĒKS pogu, lai ieslēgtu ierīci.
- Nospiediet pogu AVOTS button repeatedly until "BT" appears on the display and the Bluetooth indicator flashes, indicating pairing mode.
- Savā Bluetooth iespējotajā ierīcē (piemēram, viedtālrunī, planšetdatorā) iespējojiet Bluetooth un meklējiet pieejamās ierīces.
- Select "iTOMA CKS3501BT" from the list. Once paired, the Bluetooth indicator on the alarm clock will stop flashing and remain solid.
- You can now play audio from your device through the alarm clock's speakers. Use the SKAĻUMS - / SKAĻUMS + buttons on the alarm clock or your device to adjust the volume.
4.7 Papildu ieeja (AUX)
Connect external audio devices (e.g., MP3 players) using a 3.5mm audio cable (not included).
- Connect one end of a 3.5mm audio cable to the AUX IN jack on the back of the unit.
- Pievienojiet otru galu ārējās ierīces austiņu ligzdai vai audio izejai.
- Nospiediet pogu SPĒKS pogu, lai ieslēgtu ierīci.
- Nospiediet pogu AVOTS button repeatedly until "AUX" appears on the display.
- Atskaņojiet audio no ārējās ierīces. Regulējiet skaļumu, izmantojot SKAĻUMS - / SKAĻUMS + buttons on the alarm clock or your external device.
4.8 USB lādēšanas ports

Figure 4.3: The iTOMA CKS3501BT features a USB port for charging mobile devices.
The USB port on the back of the unit is for charging mobile devices only. It does not support data transfer or playing music from USB drives.
- Connect your mobile device's USB charging cable to the USB port on the alarm clock.
- Pievienojiet kabeļa otru galu mobilajai ierīcei.
- Jūsu ierīce sāks uzlādēt.
4.9 Displeja spilgtums (aptumšošana)

Figure 4.4: The iTOMA CKS3501BT offers an auto-dimmer function and manual brightness control for its display.
The display has an auto-dimmer feature that adjusts brightness based on ambient light. You can also manually adjust it.
- Nospiediet pogu ATLIKT / DIMMER button repeatedly to cycle through different brightness levels (e.g., High, Medium, Low, Auto).
- Select "Auto" for automatic brightness adjustment.
5. Apkope
5.1. Tīrīšana
- Pirms tīrīšanas atvienojiet strāvas adapteri.
- Izmantojiet mīkstu, sausu drānu, lai noslaucītu ierīces ārpusi.
- Do not use liquid cleaners, abrasive cleaners, or sprays, as they may damage the finish.
5.2 Rezerves akumulators
The unit contains a pre-installed lithium-metal backup battery. This battery is designed to retain time and alarm settings during brief power interruptions. It is not user-replaceable and does not power the unit for normal operation.
6. Traucējummeklēšana
| Problēma | Iespējamais cēlonis | Risinājums |
|---|---|---|
| Iekārta neieslēdzas. | Strāvas adapteris nav pievienots vai ir bojāts. | Pārliecinieties, vai strāvas adapteris ir droši pievienots ierīcei un darbojošai sienas kontaktligzdai. |
| No sound from FM radio. | Weak signal; volume too low; incorrect source. | Adjust FM antenna position. Increase volume. Ensure "FM" source is selected. |
| Bluetooth ierīci nevar savienot pārī. | Unit not in pairing mode; device too far; Bluetooth already connected. | Ensure "BT" is flashing on the display. Move device closer. Disconnect from other Bluetooth devices. |
| Trauksmes signāls neskan. | Alarm not activated; volume too low; incorrect time. | Verify alarm indicator (1 or 2) is on. Check alarm volume setting. Confirm alarm time is correct. |
| USB uzlāde nedarbojas. | Cable faulty; device not compatible; unit not powered. | Try a different USB cable. Ensure the alarm clock is powered on. |
7. Specifikācijas
- Modelis: CKS3501BT
- Displejs: 1.4-inch Blue LED
- Barošanas avots: AC 100-240V, 50/60Hz (via power adapter)
- Rezerves akumulators: 1 x Lithium-metal (pre-installed)
- Radio joslas: FM
- Bluetooth versija: (Not specified, assuming standard)
- USB uzlādes izeja: (Not specified, typically 5V/1A)
- Papildu ieeja: 3.5 mm stereo ligzda
- Izmēri: 14.5 x 8 x 7.52 cm (5.71 x 3.15 x 2.93 collas)
- Svars: 390.09 g (0.86 mārciņas)
- Materiāls: Plastmasa

Figure 7.1: Dimensions of the iTOMA CKS3501BT Radio Alarm Clock.
8. Garantija un atbalsts
For warranty information or technical support, please refer to the warranty card included with your product or visit the official iTOMA webvietne. Saglabājiet pirkuma čeku kā pirkuma apliecinājumu.
iTOMA Official Webvietne: www.itoma.com


