1. Ievads
This user manual provides comprehensive instructions for the installation, operation, and maintenance of your Immergas CARV2 Wireless Chronothermostat. Please read this manual thoroughly before using the device to ensure proper functionality and safety. This device is designed for precise temperature control in HVAC systems.
2. Drošības informācija
Vienmēr ievērojiet šādus drošības pasākumus:
- Uzstādīšanu drīkst veikt tikai kvalificēts personāls saskaņā ar vietējiem elektrības noteikumiem.
- Pirms jebkādu uzstādīšanas vai apkopes darbu veikšanas atvienojiet strāvas padevi.
- Nepakļaujiet ierīci ūdens vai pārmērīga mitruma iedarbībai.
- Nemēģiniet ierīci remontēt pats. Visus apkopes darbus uzticiet kvalificētam servisa personālam.
- Ensure the power supply matches the device's specifications (230 Volts).
3. Produkts beidziesview
The Immergas CARV2 is a wireless digital chronothermostat designed for efficient heating and cooling management. It features a clear display and intuitive controls for setting desired temperatures and programming schedules.
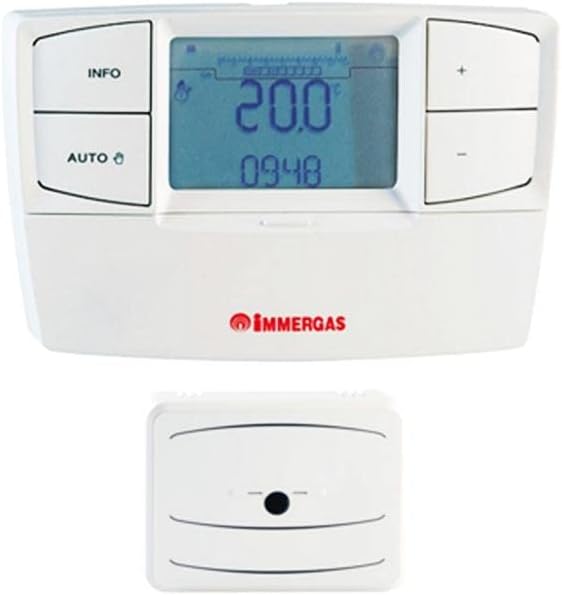
Figure 3.1: Immergas CARV2 Wireless Chronothermostat (top) showing the display with temperature and time, and control buttons (INFO, AUTO, +, -). Below it is the wireless receiver unit (bottom) with a small indicator light.
3.1 Sastāvdaļas
- Termostata bloks: Galvenais vadības bloks ar displeju un pogām.
- Wireless Receiver Unit: Connects to the HVAC system and communicates wirelessly with the thermostat unit.
3.2 Displejs un pogas
The thermostat unit features a digital display showing current temperature, set temperature, time, and operating mode. Control buttons include:
- INFO poga: Accesses information screens.
- AUTO poga: Toggles between automatic and manual operating modes.
- + Poga: Increases temperature setting or navigates menus.
- - Poga: Decreases temperature setting or navigates menus.
4. Iestatīšana un instalēšana
Proper installation is crucial for optimal performance. Refer to the detailed wiring diagrams provided with the product packaging for specific connections.
4.1 Uztvērēja bloka uzstādīšana
- Ensure power to the HVAC system is turned off at the main breaker.
- Mount the receiver unit near your boiler or heating system, ensuring it is within wireless range of the thermostat unit.
- Connect the receiver unit to your HVAC system's control wiring according to the provided wiring diagram. This typically involves connecting to the boiler's thermostat terminals.
- Secure the receiver unit to the wall or mounting surface.
4.2 Thermostat Unit Placement
- Place the thermostat unit in a central location within the heated area, away from direct sunlight, drafts, or heat sources (e.g., lamp(s, sadzīves tehnika).
- Ensure the location allows for accurate room temperature sensing.
- The thermostat unit is battery-powered (batteries not included, typically AA or AAA). Insert fresh batteries before initial use.
4.3 Initial Pairing (if required)
Some units may require initial pairing between the thermostat and receiver. Refer to the quick start guide for specific pairing instructions. Generally, this involves pressing a pairing button on both units within a short timeframe.
5. Lietošanas instrukcijas
5.1 Power On and Initial Display
Once batteries are inserted and the receiver is powered, the thermostat display will illuminate, showing the current room temperature and time.
5.2. Laika un datuma iestatīšana
Access the settings menu (often by holding the INFO button) to set the correct time and date. Use the + and - buttons to adjust values and the INFO or AUTO button to confirm and move to the next setting.
5.3. Darbības režīmi
- Automātiskais režīms (AUTO): The thermostat follows the programmed weekly schedule. Press the AUTO button to activate this mode.
- Manuālais režīms: Allows you to set a constant desired temperature that overrides the schedule. Press the AUTO button until the manual mode indicator appears. Use + and - to adjust the temperature.
- Izslēgts režīms: Turns off heating/cooling. Consult the manual for specific steps to enter this mode, often by setting a very low temperature or a dedicated off setting.
5.4 Temperatūras regulēšana
In manual mode, or during a temporary override in auto mode, use the + un - buttons to increase or decrease the desired temperature. The new setpoint will be displayed.
5.5 Programming Weekly Schedule
The CARV2 allows for a detailed weekly programming schedule. This typically involves setting different temperatures for various times of the day across each day of the week.
- Enter programming mode (refer to your specific model's manual, often by holding INFO or AUTO for several seconds).
- Izvēlieties nedēļas dienu, kuru vēlaties programmēt.
- Set the desired temperature for specific time intervals (e.g., 6:00 AM - 8:00 AM, 8:00 AM - 5:00 PM, etc.).
- Repeat for all desired time intervals and days.
- Save and exit programming mode.
6. Apkope
6.1. Tīrīšana
Clean the thermostat unit with a soft, dry cloth. Do not use abrasive cleaners, solvents, or spray directly onto the unit. Ensure no moisture enters the device.
6.2. Akumulatora nomaiņa
When the low battery indicator appears on the display, replace the batteries immediately. Use high-quality alkaline batteries (e.g., AA or AAA, depending on model). Open the battery compartment on the back of the thermostat unit, remove old batteries, and insert new ones, observing polarity.
7. Traucējummeklēšana
| Problēma | Iespējamais cēlonis | Risinājums |
|---|---|---|
| Displejs ir tukšs. | No power to thermostat unit (dead batteries). | Nomainiet baterijas. |
| Termostats nekontrolē apkuri/dzesēšanu. | Receiver unit not powered or not paired. Incorrect wiring. | Check power to receiver. Re-pair thermostat and receiver. Verify wiring connections. |
| Temperatūras rādījumi šķiet neprecīzi. | Thermostat placed in an unsuitable location (direct sunlight, draft). | Relocate thermostat to a more central and stable temperature area. |
| Scheduled program not running. | Thermostat is in manual mode. Program not saved correctly. | Switch to AUTO mode. Re-enter and save the program. |
8. Specifikācijas
| Funkcija | Detaļas |
|---|---|
| Zīmols | Immergas |
| Modeļa numurs | 7T.81.0.000.2301 |
| Krāsa | Balts |
| Preces svars | 1 kilogrami |
| Voltage | 230 volts |
| Savienojamības tehnoloģija | Bezvadu |
| Barošanas avots | Electric Cable (for receiver), Battery (for thermostat unit) |
| Kontrollera tips | Spiedpoga |
| Temperatūras kontroles veids | Manual / Programmable |
| Īpaši produkta lietojumi | HVAC |
9. Garantija un atbalsts
For warranty information and technical support, please refer to the documentation included with your product or contact Immergas customer service directly. Spare parts availability information is not provided at this time.
Piezīme: Produkta specifikācijas un funkcijas var tikt mainītas bez iepriekšēja brīdinājuma.


