1. Ievads un beigasview
The Escort EDM 1111A is a versatile digital multimeter designed for accurate measurement of various electrical parameters. This device is essential for electricians, technicians, and hobbyists for testing circuits, components, and power sources. It features a clear digital display and a rotary dial for selecting different measurement functions.

The Escort EDM 1111A Digital Multimeter with red and black test leads connected, ready for use.
Galvenās funkcijas ietver:
- DC sējtage (DCV) measurement
- AC sējtage (ACV) measurement
- DC Current (DCA) measurement
- AC Current (ACA) measurement
- Pretestības (Ω) mērīšana
- Capacitance (CX) measurement
- Diode and Transistor (hFE) testing
2. Iestatīšana
2.1 Akumulatora uzstādīšana
The Escort EDM 1111A requires a DC 9V 006P battery for operation. To install or replace the battery:
- Pārliecinieties, vai multimetrs ir izslēgts.
- Atrodiet bateriju nodalījumu ierīces aizmugurē.
- Carefully slide open or unscrew the battery cover.
- Insert a new 9V 006P battery, observing the correct polarity (+/-).
- Droši uzlieciet akumulatora vāciņu.

Aizmugure view of the Escort EDM 1111A Digital Multimeter, showing the battery compartment cover and the product label.
2.2 Testa vadu pievienošana
The multimeter comes with two test leads, typically one red (positive) and one black (negative/common). Proper connection is crucial for accurate and safe measurements.
- Lielākajai daļai tilpumatage, resistance, and low current measurements, connect the black lead to the 'COM' (Common) jack.
- Connect the red lead to the 'V-Ω-mA' jack for voltage, pretestība un miliampšeit strāvas mērījumi.
- For high current measurements (up to 10A), connect the red lead to the '10A' jack. Always ensure the correct jack is used to prevent damage to the meter or circuit.

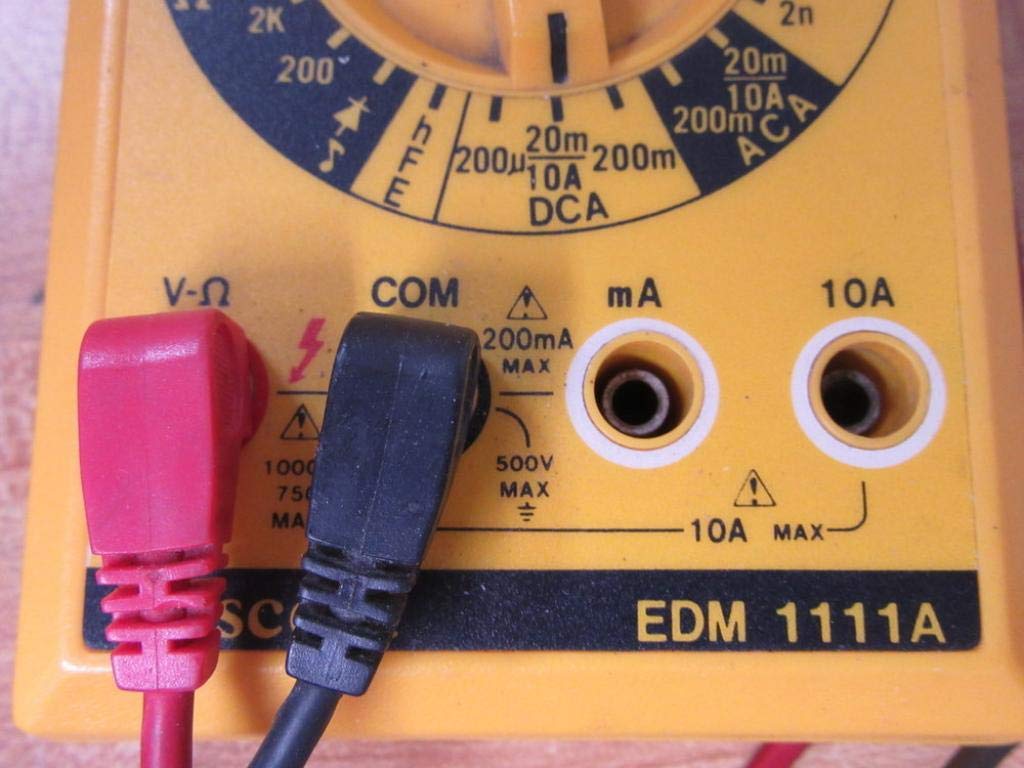
A closer look at the input jacks (V-Ω, COM, mA, 10A) and the lower portion of the rotary dial, indicating current measurement ranges.

The red and black test probes (leads) used with the Escort EDM 1111A Digital Multimeter, featuring pointed tips for electrical contact.
3. Lietošanas instrukcijas
Before taking any measurements, ensure the test leads are correctly connected and the rotary dial is set to the appropriate function and range.

Detalizēti view of the rotary selector dial on the Escort EDM 1111A Digital Multimeter, displaying various measurement functions such as DCV, ACV, Ω, DCA, ACA, and CX.
3.1. Līdzstrāvas mērīšana Voltage (DCV)
- Set the rotary dial to the desired DCV range (e.g., 200m, 2, 20, 200, 1000). Choose a range higher than the expected voltage.
- Connect the red lead to the positive (+) side of the circuit and the black lead to the negative (-) side.
- Izlasiet sējtage vērtība displejā.
3.2. Maiņstrāvas mērīšana Voltage (ACV)
- Set the rotary dial to the desired ACV range (e.g., 200m, 2, 20, 200, 750). Choose a range higher than the expected voltage.
- Pievienojiet testa vadus maiņstrāvas spriegumamtage source. Polarity does not matter for AC voltage.
- Izlasiet sējtage vērtība displejā.
3.3 Pretestības (Ω) mērīšana
- Pirms pretestības mērīšanas pārliecinieties, vai ķēde vai komponents ir atvienots no strāvas.
- Set the rotary dial to the desired Ω range (e.g., 200, 2K, 20K, 200K, 2M, 20M, 200M).
- Pievienojiet testa vadus mērāmajai sastāvdaļai.
- Displejā nolasiet pretestības vērtību.
3.4 Measuring DC Current (DCA)
- Pārliecinieties, ka ķēde ir atvienota no strāvas.
- Set the rotary dial to the desired DCA range (e.g., 200µ, 2m, 20m, 200m, 10A).
- Svarīgi: For currents up to 200mA, use the 'V-Ω-mA' jack for the red lead. For currents up to 10A, use the '10A' jack.
- Break the circuit and connect the multimeter in series with the load. The current must flow through the multimeter.
- Re-energize the circuit and read the current value.
3.5 Measuring AC Current (ACA)
- Pārliecinieties, ka ķēde ir atvienota no strāvas.
- Set the rotary dial to the desired ACA range (e.g., 200µ, 2m, 20m, 200m, 10A).
- Svarīgi: For currents up to 200mA, use the 'V-Ω-mA' jack for the red lead. For currents up to 10A, use the '10A' jack.
- Break the circuit and connect the multimeter in series with the load.
- Re-energize the circuit and read the current value.
3.6 Measuring Capacitance (CX)
- Pirms testēšanas pārliecinieties, vai kondensators ir pilnībā izlādējies.
- Set the rotary dial to the CX range (e.g., 2n, 20n, 200n, 2µ, 20µ).
- Pievienojiet testa vadus kondensatora spailēm.
- Displejā nolasiet kapacitātes vērtību.
3.7 Diode and Transistor (hFE) Testing
Refer to the specific markings on the dial for diode and transistor testing functions. Typically, diode test mode allows checking the forward voltage drop of a diode, and hFE mode is used for measuring the DC current gain of transistors.
4. Apkope
4.1. Akumulatora nomaiņa
Replace the 9V 006P battery when the low battery indicator appears on the display or if the multimeter fails to power on. Follow the instructions in Section 2.1.
4.2. Tīrīšana
To clean the multimeter, use a soft, damp cloth. Do not use abrasive cleaners or solvents, as they may damage the casing or display. Ensure the device is turned off and disconnected from any circuits before cleaning.
4.3. Uzglabāšana
When not in use for extended periods, store the multimeter in a cool, dry place, away from direct sunlight and extreme temperatures. Consider removing the battery to prevent leakage, which could damage the internal components.
5. Traucējummeklēšana
| Problēma | Iespējamais cēlonis | Risinājums |
|---|---|---|
| Nav displeja vai blāvs displejs | Zems vai izlādējies akumulators | Replace the 9V 006P battery. |
| Nepareizi rādījumi | Incorrect range selected Poor lead connection Damaged test leads Incorrect input jack used | Izvēlieties atbilstošo diapazonu. Ensure leads are firmly connected. Inspect and replace damaged leads. Verify leads are in the correct V-Ω-mA or 10A jack. |
| Tiek parādīts "OL" (pārslodze) | Measurement exceeds selected range | Pārslēdzieties uz augstāku diapazonu. |
| Nav nepārtrauktības pīkstiena | Continuity function not selected Atvērta ķēde | Ensure dial is on continuity/diode test. Check the circuit for breaks. |
6. Specifikācijas
| Parametrs | Vērtība |
|---|---|
| Modelis | EDM 1111A |
| Produkta izmēri (G x P x A) | 8 x 4 x 2 collas |
| Preces svars | 1.84 mārciņas |
| Barošanas avots | DC 9V 006P Battery |
| Mērījumu veids | Multimetrs |
| Ražotājs | Eskorts |
| Datums pirmais pieejams | 21. gada 2019. novembris |
| DC sējtage Diapazoni | 200mV, 2V, 20V, 200V, 1000V |
| AC sējtage Diapazoni | 200mV, 2V, 20V, 200V, 750V |
| DC Current Ranges | 200µA, 2mA, 20mA, 200mA, 10A |
| AC Current Ranges | 200µA, 2mA, 20mA, 200mA, 10A |
| Pretestības diapazoni | 200Ω, 2KΩ, 20KΩ, 200KΩ, 2MΩ, 20MΩ, 200MΩ |
| Capacitance Ranges | 2nF, 20nF, 200nF, 2µF, 20µF |
7. Informācija par garantiju
For specific warranty details regarding your Escort EDM 1111A Digital Multimeter, please refer to the documentation provided at the time of purchase or contact the manufacturer directly. Warranty terms typically cover defects in materials and workmanship under normal use.
8. Klientu atbalsts
If you encounter any issues or have questions not covered in this manual, please contact Escort customer support. Have your product model number (EDM 1111A) and serial number (if applicable, found on the back label) ready when contacting support for faster assistance.
The product label on the back of the Escort EDM 1111A, indicating 'DIGITAL MULTIMETER DC 9V 006P BATTERY', serial number, and 'MADE IN TAIWAN R.O.C.'.


