1. Ievads
This manual provides detailed instructions for the setup, operation, maintenance, and troubleshooting of your Sharkoon Light² 200 Gaming Mouse. Please read this manual thoroughly before using the device to ensure optimal performance and longevity.
2. Iepakojuma saturs
Pārliecinieties, vai iepakojumā ir visi priekšmeti:
- Sharkoon Light² 200 Gaming Mouse
- Interchangeable Solid Top Cover (7g)
- Set of Replacement PTFE Glide Feet
- Lietošanas pamācība
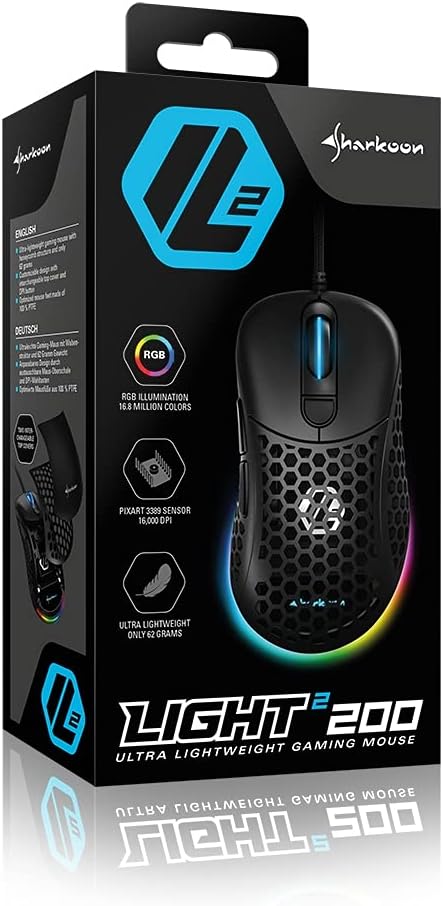
Image: The retail packaging for the Sharkoon Light² 200 Gaming Mouse, showing the mouse and its key features.
3. Iestatīšana
3.1 Peles pievienošana
- Unpack the Sharkoon Light² 200 Gaming Mouse from its packaging.
- Pievienojiet peles kabeļa USB savienotāju datora brīvajam USB portam.
- Operētājsistēma automātiski noteiks un instalēs nepieciešamos draiverus.

Image: The Sharkoon Light² 200 Gaming Mouse with its USB cable, ready for connection to a computer.
3.2 Programmatūras instalēšana
For full customization and access to all features, download and install the Sharkoon gaming software from the official Sharkoon website. The software allows for DPI adjustments, button programming, and RGB lighting control.
- Visit the official Sharkoon webvietne.
- Navigate to the support or downloads section for the Light² 200 Gaming Mouse.
- Download the latest version of the gaming software.
- Izpildiet ekrānā redzamos norādījumus, lai pabeigtu instalēšanu.
4. Peles lietošana
4.1 Pamatfunkcijas
The Light² 200 features standard mouse buttons and a scroll wheel:
- Kreisais klikšķis: Galvenās darbības poga.
- Ar peles labo pogu noklikšķiniet: Otrās darbības poga, parasti konteksta izvēlnēm.
- Ritināšanas ritenis: For vertical scrolling. Can also be pressed for a middle-click function.
- Sānu pogas: Two buttons located on the left side, typically for 'forward' and 'back' navigation.
- DPI poga: Located behind the scroll wheel, used to cycle through DPI settings.

Attēls: Sāns view of the Sharkoon Light² 200 Gaming Mouse, highlighting the two programmable side buttons and the honeycomb structure.
4.2 DPI regulēšana
The optical PixArt sensor supports up to 16,000 DPI. You can adjust the DPI sensitivity using the dedicated DPI button behind the scroll wheel or through the Sharkoon gaming software. The RGB lighting on the scroll wheel and rear of the mouse indicates the current DPI profile.
4.3 programmējamās pogas
The Light² 200 features six programmable buttons. Use the Sharkoon gaming software to assign custom functions, macros, or key bindings to these buttons for an optimized gaming experience.
4.4 RGB apgaismojuma pielāgošana
The mouse features adjustable RGB illumination on the scroll wheel and the back end. The gaming software allows you to customize colors, effects, and brightness to match your preferences or gaming setup.
4.5 Modular Design: Changing the Top Cover
The Light² 200 has a modular design, allowing you to change the top surface. The default honeycomb top cover can be replaced with a closed 7-gram alternative for a different feel or aesthetic.
- Gently lift the rear edge of the honeycomb top cover to detach it. It is held by magnets.
- Align the replacement solid top cover with the mouse body and gently press it down until the magnets secure it in place.

Image: The Sharkoon Light² 200 Gaming Mouse with its honeycomb top cover removed, revealing the internal structure and magnetic attachment points.
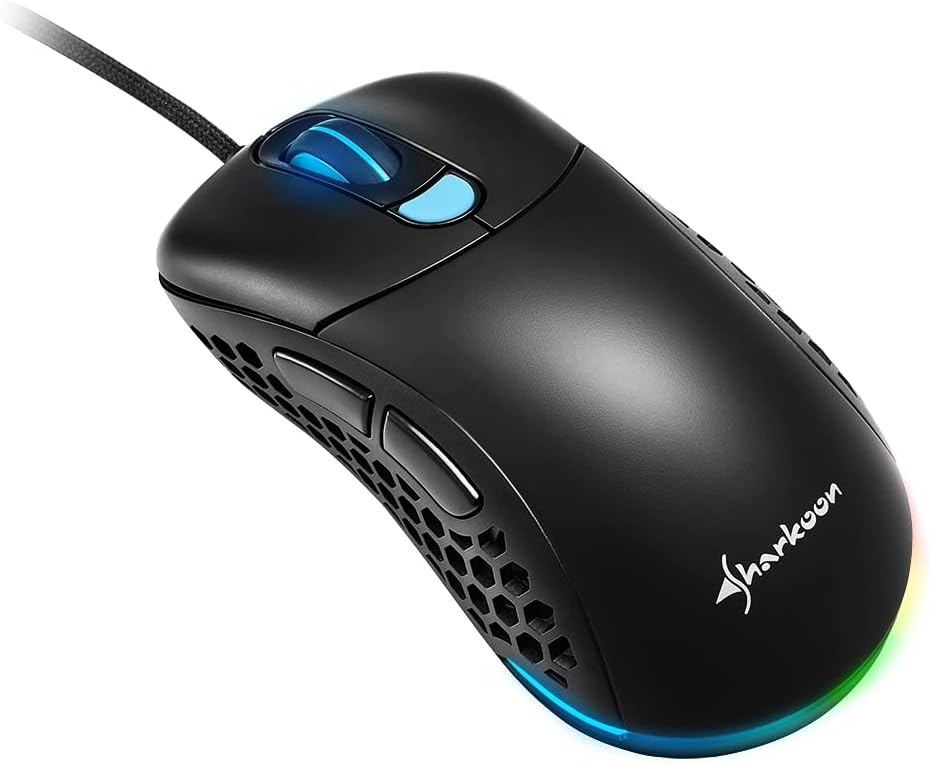
Image: The Sharkoon Light² 200 Gaming Mouse with the alternative solid top cover installed, providing a different aesthetic and feel.
5. Apkope
5.1 Peles tīrīšana
Lai uzturētu optimālu veiktspēju, regulāri tīriet peli:
- Disconnect the mouse from your computer.
- Peles virsmas noslaukšanai izmantojiet mīkstu, sausu drānu.
- Noturīgiem netīrumiem nedaudz uzsūcietampNoslaukiet drānu ar ūdeni vai maigu tīrīšanas līdzekli. Izvairieties no spēcīgām ķīmiskām vielām.
- Use compressed air to clear dust from the honeycomb structure and around buttons.
- Clean the optical sensor area with a cotton swab lightly dampar izopropilspirtu.
5.2 Replacing PTFE Glide Feet
The PTFE glide feet ensure smooth movement. If they become worn, replace them using the included spare set:
- Carefully peel off the old PTFE feet using a thin, non-abrasive tool.
- Clean the surface where the feet were attached to ensure no residue remains.
- Peel the new PTFE feet from their backing and carefully apply them to the corresponding areas on the mouse's underside.
- Stingri piespiediet, lai nodrošinātu pareizu saķeri.

Image: The underside of the Sharkoon Light² 200 Gaming Mouse, showing the optical sensor, the DPI switch, and the four white PTFE glide feet.
6. Traucējummeklēšana
- Pele nereaģē:
- Ensure the USB cable is securely connected to a working USB port.
- Try connecting the mouse to a different USB port or another computer to rule out port or system issues.
- Restartējiet datoru. - DPI iestatījumi nemainās:
- Ensure the Sharkoon gaming software is installed and running.
- Check if the DPI button is functioning correctly. - RGB apgaismojums nedarbojas vai ir nepareizs:
- Verify that the Sharkoon gaming software is installed and that lighting settings are configured correctly.
- Ensure the mouse is properly connected. - Mouse movement is erratic or imprecise:
- Notīriet optisko sensoru peles apakšpusē.
- Ensure you are using the mouse on a suitable surface (e.g., a mouse pad).
- Check for any physical obstructions around the sensor. - Pogas nereaģē:
- Check button assignments in the Sharkoon gaming software.
- Ensure no physical debris is obstructing the button mechanism.
7. Specifikācijas
| Funkcija | Detaļas |
|---|---|
| Modeļa nosaukums | Light² 200 |
| Preces modeļa numurs | 4044951029013 |
| Produkta izmēri | 4.72 x 2.6 x 1.65 collas (120 x 66 x 42 mm) |
| Preces svars | 2.19 unces (62 grami) |
| Kustību noteikšanas tehnoloģija | Optical (PixArt Sensor) |
| Maksimālais DPI | 16,000 DPI |
| Programmējamās pogas | 6 |
| Savienojamības tehnoloģija | USB |
| Īpaša iezīme | RGB LED Lights, Modular Design |
| Ražotājs | Sharkoon Technologies |
8. Garantija un atbalsts
8.1 Informācija par garantiju
Sharkoon products are covered by a manufacturer's warranty against defects in materials and workmanship. The specific warranty period and terms may vary by region. Please retain your proof of purchase for warranty claims.
8.2 Tehniskais atbalsts
For technical assistance, driver downloads, or further information, please visit the official Sharkoon webvietne:
- Webvietne: www.sharkoon.com
You may also find FAQs and troubleshooting guides on their support pages.