1. Ievads
Welcome to the user manual for your Ulefone Armor X9 Rugged Phone. This guide provides essential information on setting up, operating, maintaining, and troubleshooting your device. The Ulefone Armor X9 is designed for durability and performance, featuring robust protection and advanced functionalities.
Key features of your Ulefone Armor X9 include:
- IP68/IP69K Grade 360 All Round Protection: Izstrādāts, lai izturētu skarbu vidi.
- Android 11 operētājsistēma: Enjoy the latest Android experience.
- 4 GB RAM + 128 GB ROM: Ample memory and storage for your applications and data.
- 16MP Triple Rear Camera: Uzņemiet augstas kvalitātes fotoattēlus un videoklipus.
- Massive 5580mAh Battery Capacity: Pagarināts lietošanas laiks.
- Triple Navigation System: Enhanced positioning accuracy.
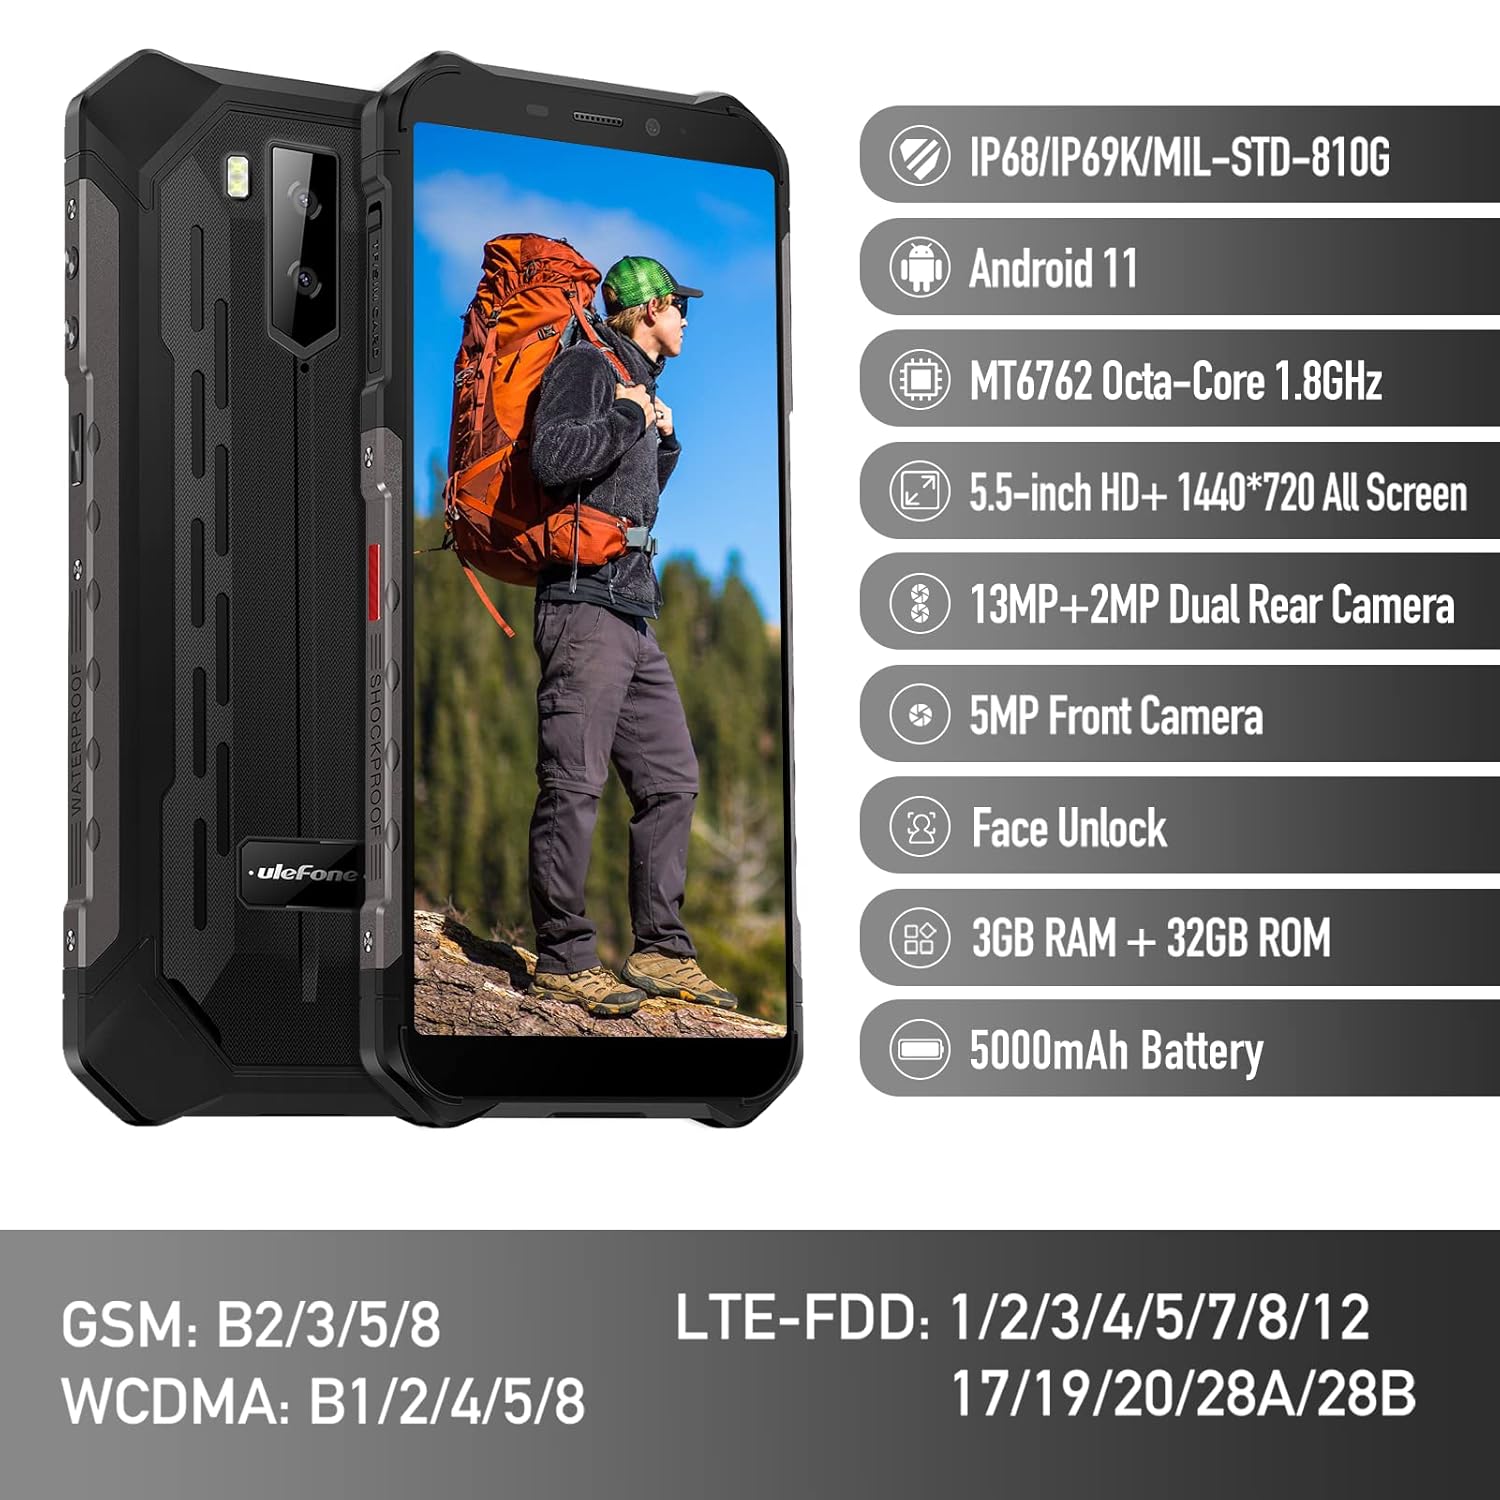
Figure 1: Ulefone Armor X9 Rugged Phone overview, highlighting its robust design and core specifications like IP68/IP69K rating, Android 11, Octa-Core processor, 5.5-inch HD+ screen, 13MP+2MP dual rear camera, 5MP front camera, Face Unlock, 3GB RAM + 32GB ROM, and 5000mAh battery.
2. Iestatīšana
2.1. SIM kartes un TF kartes ievietošana
The Ulefone Armor X9 supports dual SIM cards and a TF (microSD) card for expandable storage. Follow these steps to install them:
- Atrodiet SIM kartes paliktni tālruņa sānos.
- Atveriet paplāti, izmantojot komplektā iekļauto SIM kartes izņemšanas rīku.
- Carefully place your Nano-SIM cards into the designated slots (SIM1 and SIM2).
- If using a TF card, place it into the dedicated TF card slot. Note that some configurations may share a slot between SIM2 and the TF card.
- Gently push the tray back into the phone until it is flush with the device body. Ensure the tray is properly sealed to maintain water and dust resistance.

Figure 2: Illustration of the dual SIM and TF card tray, showing how to insert SIM1, SIM2, and a TF card into the Ulefone Armor X9.
2.2. Sākotnējā uzlāde
Before first use, it is recommended to fully charge your Ulefone Armor X9. Use the provided USB cable and power adapter.
- Pievienojiet USB kabeli tālruņa uzlādes portam.
- Pievienojiet otru USB kabeļa galu strāvas adapterim.
- Pievienojiet strāvas adapteri sienas kontaktligzdai.
- The charging indicator will appear on the screen. Allow the phone to charge until the battery icon shows full.
2.3. Ieslēgšana/izslēgšana
- Lai ieslēgtu: Press and hold the Power button (usually on the right side) until the Ulefone logo appears.
- Lai izslēgtu: Nospiediet un turiet ieslēgšanas/izslēgšanas pogu, līdz ekrānā parādās barošanas opciju izvēlne. Atlasiet "Izslēgt" un apstipriniet.
- Lai restartētu: Barošanas opciju izvēlnē atlasiet “Restartēt” un apstipriniet.
3. Lietošanas instrukcijas
3.1. Pamata navigācija (Android 11)
Your Ulefone Armor X9 runs on Android 11, offering an intuitive user interface. Common gestures and navigation include:
- Pavelciet uz augšu: Piekļūstiet lietotņu atvilktnei.
- Pavelciet uz leju: Atveriet paziņojumu paneli un ātros iestatījumus.
- Pieskarieties: Atlasiet vienumu vai atveriet lietotni.
- Ilgi nospiediet: Piekļūstiet kontekstuālajām izvēlnēm vai pārvietojiet ikonas.
- Savilkšana, lai tuvinātu: Pietuviniet vai attāliniet attēlus un web lapas.

Figure 3: Screenshots of the Android 11 interface on the Ulefone Armor X9, showing settings menus, quick toggles, and the sound recorder application.

Figure 4: The 5.5-inch 18:9 All Screen display of the Ulefone Armor X9, showcasing its immersive viewing experience with an image of a skier.
3.2. Kameras lietošana
Your phone is equipped with a 16MP Triple Rear Camera and a Front Camera. To use the camera:
- Atveriet lietotni “Kamera” sākuma ekrānā vai lietotņu atvilktnē.
- Pieskarieties slēdža pogai, lai uzņemtu fotoattēlu.
- Pārslēdzieties starp foto un video režīmiem pēc nepieciešamības.
- Tap the icon to switch between the front and rear cameras.
- Lai iegūtu optimālus rezultātus, izpētiet dažādus kameras režīmus un iestatījumus.
3.3. Savienojamība
The Ulefone Armor X9 supports various connectivity options:
- Wi-Fi: Lai izveidotu savienojumu ar pieejamajiem tīkliem, dodieties uz Iestatījumi > Tīkls un internets > Wi-Fi.
- Bluetooth: Go to Settings > Connected devices > Bluetooth to pair with Bluetooth devices.
- GPS: The phone features AGPS for accurate location services. Ensure location services are enabled in Settings > Location.
- USB: Connect your phone to a computer using a USB cable for data transfer or charging.
3.4. Sejas atbloķēšana
For convenient and secure unlocking, your Ulefone Armor X9 supports Face Unlock:
- Go to Settings > Security > Face Unlock.
- Izpildiet ekrānā redzamos norādījumus, lai reģistrētu savu seju.
- Ensure good lighting and hold the phone at eye level during registration.
- Kad esat reģistrējies, varat atbloķēt tālruni, vienkārši paskatoties uz priekšējo kameru.
4. Apkope
4.1. Tīrīšana un kopšana
To maintain the performance and appearance of your rugged phone:
- Noslaukiet ekrānu un korpusu ar mīkstu, nepūkošu drānu.
- Noturīgiem netīrumiem izmantojiet nedaudz damp Izvairieties no spēcīgām ķīmiskām vielām vai abrazīviem materiāliem.
- Ensure all port covers are securely closed to maintain water and dust resistance, especially after charging or using headphones.

Figure 5: The Ulefone Armor X9's 360° All Protection Design, showcasing its superior materials and superb durability against impacts and harsh conditions.
4.2. Water and Dust Resistance (IP68/IP69K)
The Ulefone Armor X9 is rated IP68/IP69K, meaning it is resistant to dust and water immersion. However, this resistance is not permanent and may decrease over time with normal wear. To ensure optimal protection:
- Do not intentionally submerge the phone in water for extended periods or beyond specified depths.
- Avoid exposing the phone to high-pressure water or extreme temperatures.
- Ensure all port covers are tightly sealed before exposure to water or dust.
- Ja tālrunis kļūst mitrs, pirms uzlādes vai jebkuru portu atvēršanas to rūpīgi nosusiniet.
4.3. Akumulatora kopšana
To prolong the life of your 5580mAh Lithium Polymer battery:
- Izvairieties no ekstremālām temperatūrām (karstas vai aukstas), jo tās var pasliktināt akumulatora veiktspēju.
- Izmantojiet tikai oriģinālo lādētāju un kabeli vai sertificētus saderīgus piederumus.
- Neļaujiet akumulatoram bieži pilnībā izlādēties. Uzlādējiet to, pirms tas sasniedz ļoti zemu uzlādes līmeni.
5. Traucējummeklēšana
If you encounter issues with your Ulefone Armor X9, try the following troubleshooting steps:
5.1. Tālrunis neieslēdzas
- Ensure the battery is charged. Connect the phone to a charger for at least 30 minutes.
- Nospiediet un 10–15 sekundes turiet nospiestu ieslēgšanas/izslēgšanas pogu, lai piespiedu kārtā restartētu ierīci.
5.2. Uzlādes problēmas
- Verify that the charging cable and adapter are working correctly. Try a different charger if available.
- Pārliecinieties, vai uzlādes ports ir tīrs un bez netīrumiem.
- Make sure the charging cable is fully inserted into the port. Some rugged phone ports may require a firm connection due to protective covers.
5.3. SIM/TF Card Not Detected
- Ensure the SIM/TF card is correctly inserted into the tray and the tray is fully seated.
- Restartējiet tālruni.
- Check if the SIM card is active with your network provider.
5.4. App Crashes or Freezing
- Aizveriet un atkārtoti atveriet problemātisko lietotni.
- Notīriet lietotnes kešatmiņu un datus (Iestatījumi > Lietotnes > [Lietotnes nosaukums] > Krātuve un kešatmiņa).
- Pārliecinieties, vai lietotne ir atjaunināta uz jaunāko versiju.
- Restartējiet tālruni.
5.5. Rūpnīcas atiestatīšana
Ja problēmas joprojām pastāv, rūpnīcas atiestatīšana var tās novērst. Brīdinājums: Tas izdzēsīs visus datus jūsu tālrunī. Pirms turpināt, dublējiet svarīgos datus.
- Dodieties uz Iestatījumi > Sistēma > Atiestatīšanas opcijas.
- Atlasiet “Dzēst visus datus (rūpnīcas atiestatīšana)”.
- Apstipriniet savu lēmumu un, ja tiek prasīts, ievadiet PIN kodu/paroli.
6. Specifikācijas
Below are the detailed specifications for the Ulefone Armor X9:

Figure 6: Details of the Ulefone Armor X9's Octa-Core Processor, highlighting its power-efficient yet powerful performance, along with 3GB RAM and 32GB ROM, and support for up to 256GB TF card extendable storage.
| Funkcija | Specifikācija |
|---|---|
| Operētājsistēma | Android 11.0 |
| RAM | 3 GB (Note: Feature bullets mention 4GB RAM, please verify actual model) |
| Atmiņas krātuves ietilpība | 32 GB (Expandable with TF card up to 256GB. Feature bullets mention 128GB ROM, please verify actual model) |
| CPU modelis | MT6762 astoņkodolu 1.8 GHz (Note: Specifications list 'Snapdragon', but image indicates MT6762. Please verify actual model) |
| Produkta izmēri | 15.8 x 7.75 x 1.38 cm |
| Preces svars | 472 g |
| Baterijas | 1 Lithium Polymer battery (5580mAh, included) |
| Bezvadu sakari | Cellular, Bluetooth, USB, Wi-Fi |
| GPS | AGPS |
| Īpašas funkcijas | Rear Camera, Face Unlock, IP68/IP69K, MIL-STD-810G |
| Displejs | 5.5-inch HD+ 1440*720 All Screen |
| Aizmugurējā kamera | 13MP+2MP Dual Rear Camera (Note: Feature bullets mention 16MP Triple Rear Camera, please verify actual model) |
| Priekšējā kamera | 5MP priekšējā kamera |
| Krāsa | Melns |
| Ražotājs | Ulefone |
Note: Specifications are based on available product data and may vary slightly. Please refer to your product packaging for the most accurate information. There are discrepancies between feature bullets, specifications, and image text regarding RAM, ROM, CPU, and camera megapixels. This manual uses the most frequently cited or detailed information, with notes for clarification.
7. Garantija un atbalsts
7.1. Informācija par garantiju
Your Ulefone Armor X9 is covered by a manufacturer's warranty. The specific terms and duration of the warranty may vary by region and retailer. Please refer to the warranty card included in your product packaging or contact your point of purchase for detailed information regarding warranty coverage and claims.
7.2. Klientu atbalsts
For technical assistance, troubleshooting beyond this manual, or warranty inquiries, please contact Ulefone customer support or your authorized dealer. You can typically find contact information on the official Ulefone webvietnē vai produkta dokumentācijā.
- Visit the official Ulefone website for FAQs, software updates, and support contact details.
- Sazinoties ar atbalsta dienestu, turiet pa rokai pirkuma čeku un produkta sērijas numuru.


