1. Ievads
The Weber Genesis Smart SX-335 LP SS Liquid Propane Grill is designed to provide a comprehensive outdoor cooking experience. This manual provides essential information for the safe and efficient operation, maintenance, and troubleshooting of your new grill.

1. attēls: The Weber Genesis Smart SX-335 LP SS Liquid Propane Grill. This image shows the full grill unit with its stainless steel finish and black cabinet.
2. Svarīga drošības informācija
BRĪDINĀJUMS: Šo norādījumu neievērošana var izraisīt ugunsgrēku, sprādzienu vai apdegumus, kas var radīt īpašuma bojājumus, miesas bojājumus vai nāvi.
- Always operate the grill outdoors in a well-ventilated area.
- Neuzglabājiet un neizmantojiet benzīnu vai citus viegli uzliesmojošus tvaikus un šķidrumus šīs vai citas ierīces tuvumā.
- Glabājiet ierīces zonu tīru un tīru no degošiem materiāliem, benzīna un citiem viegli uzliesmojošiem tvaikiem un šķidrumiem.
- Netraucējiet degšanas un ventilācijas gaisa plūsmu.
- Keep any electrical supply cord and fuel supply hose away from heated surfaces.
- Pirms katras lietošanas reizes vienmēr pārbaudiet, vai nav gāzes noplūdes.
- Gatavošanas laikā nekad neatstājiet grilu bez uzraudzības.
- Vienmēr turiet bērnus un mājdzīvniekus prom no grila.
- Strādājot ar karstām sastāvdaļām, valkājiet aizsargcimdus.
3. Kas ir kastē
Jūsu Weber Genesis Smart SX-335 LP SS grill package includes the following components:
- Weber Genesis Smart SX-335 LP SS Gas Grill Unit
- Cooking Grates (porcelain-enameled cast iron)
- Flavorizer Bars
- Grease Management System (including drip tray and catch pan)
- Side Burner (integrated)
- Weber Connect Smart Grilling Hub (integrated)
- Propane Tank (sold separately, but required for operation)
- Lietošanas pamācība

2. attēls: The Weber Genesis Smart SX-335 LP SS grill with its lid closed, showcasing the stainless steel finish and control panel.
4. Iestatīšana
4.1. Montāža
Assembly of your Weber Genesis Smart SX-335 LP SS grill is required. For detailed, step-by-step interactive 3D instructions, download the free BILT app on your mobile device. This app provides visual guidance for each step of the assembly process.
Video 1: BILT App - Step by Step Interactive Assembly Instructions. This video demonstrates the interactive 3D assembly guide available through the BILT app for the Weber Genesis grill.
Ensure all parts are accounted for before beginning assembly. It is recommended to have a second person assist with assembly due to the size and weight of some components.
4.2 Connecting the Liquid Propane Tank
- Pārliecinieties, vai visas degļa vadības pogas ir OFF pozīcijā.
- Open the cabinet doors located beneath the grill.
- Place the liquid propane tank securely in the designated tank holder.
- Connect the regulator hose from the grill to the propane tank valve. Hand-tighten the connection firmly.
- Lēnām pilnībā atveriet propāna tvertnes vārstu.
- Check for any gas leaks using a soapy water solution on all connections. Bubbles indicate a leak. If a leak is detected, close the tank valve, tighten connections, and re-test. If the leak persists, do not use the grill and contact customer service.

Figure 3: A hand connecting the liquid propane tank to the grill's regulator hose inside the cabinet.
The grill cabinet features a hook that indicates the propane level by weight, helping you monitor remaining fuel.
4.3 Sākotnējā palaišana
Before first use, operate the grill on high heat for 15 minutes with the lid closed to burn off any manufacturing residues. This process is called "seasoning" the grill.
5. Lietošanas instrukcijas
5.1 Galveno degļu aizdedzināšana
- Atveriet grila vāku.
- Pārliecinieties, vai propāna tvertnes vārsts ir pilnībā atvērts.
- Turn the leftmost main burner control knob to the START/HIGH position.
- Nekavējoties nospiediet un turiet elektroniskās aizdedzes pogu, līdz deglis aizdegas.
- Once the first burner is lit, turn on adjacent burners to the desired heat setting.
- If ignition does not occur within 5 seconds, turn the burner control(s) OFF, wait 5 minutes, and repeat the lighting procedure.

4. attēls: Tuvplāns Weber Genesis grill's control knobs, showing the ignition button and burner controls.
5.2 Temperature Control and Smart Features
The Weber Genesis Smart SX-335 LP SS features integrated Weber Connect smart technology for precise temperature monitoring. The digital display on the side table shows real-time food temperatures from connected probes.
- Weber Connect App: Lejupielādēt Weber Connect app to your smartphone for remote monitoring, temperature alerts, and flip & serve notifications.
- Zondes jauda: The grill supports up to 2 temperature probes for monitoring different food items simultaneously.
- Displeja barošana: The grill display can be powered by plugging it into an electrical outlet or by using a USB-certified, 10,000mAh rechargeable power bank (sold separately) clipped under the side table.

5. attēls: The Weber Connect smart display on the grill's side table, showing temperature readings, alongside a smartphone displaying the Weber Connect app with temperature alerts.
5.3 Using the Sear Zone
The extra-large sear zone is designed for high-heat searing to achieve perfect grill marks and lock in juices. To activate the sear zone, turn the dedicated sear zone burner knob to the HIGH position. Allow it to preheat for 5-10 minutes before placing food directly over it.
5.4 Sānu degļa lietošana
The integrated side burner allows you to sauté vegetables, boil corn, or heat up sauces while grilling. To light the side burner, open its cover, turn the control knob to the START/HIGH position, and press the electronic ignition button until it ignites.

6. attēls: The Weber Genesis grill with the side burner cover open, revealing the burner grate.
5.5 Weber Crafted Outdoor Kitchen Collection
Expand your culinary possibilities with the Weber Crafted Outdoor Kitchen Collection. By replacing a cooking grate with custom-fit grillware (sold separately), you can sear, roast, bake, steam, and stir-fry. The grill locker provides convenient storage for these accessories.

7. attēls: The Weber Crafted grillware frame installed in the grill, ready to accommodate various inserts.

Figure 8: A person stir-frying vegetables and rice in a wok insert on the Weber Genesis grill.
5.6 Cooking Techniques
- Tiešais karstums: Use direct heat for searing, grilling smaller items, or cooking foods that require quick cooking.
- Netiešā siltumenerģija: For larger cuts of meat, poultry, or delicate items, use indirect heat. Turn off the burners directly beneath the food and use adjacent burners to maintain the desired temperature. The expandable top cooking grate provides additional space for indirect cooking.

Figure 9: Two whole chickens cooking on the main grates, with temperature probes inserted, demonstrating indirect cooking.

Figure 10: Grilled shrimp, mixed vegetables in a basket, and toasted bread on the upper warming rack, illustrating diverse cooking options.
6. Apkope
6.1 Gatavošanas režģu tīrīšana
After each use, while the grates are still warm, use a grill brush to scrape off any food residue. For a deeper clean, remove the grates and wash them with warm, soapy water.
6.2 Smērvielu pārvaldības sistēma
The improved grease management system simplifies cleaning. Simply pull the grease tray out from the front of the grill and scrape away accumulated grease and debris. Replace the disposable catch pan as needed.
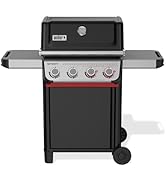
Figure 11: A hand demonstrating the removal and cleaning of the grease management system's pull-out tray.
6.3 Grila vāks
Protect your grill from the elements by using a weather-resistant grill cover when not in use. This helps prolong the life and appearance of your grill.
7. Traucējummeklēšana
| Problēma | Iespējamais cēlonis | Risinājums |
|---|---|---|
| Deglis neizdodas aizdegties | Nav gāzes plūsmas, aizsērējis deglis, bojāts aizdedzinātājs. | Check propane tank connection and fuel level. Clean burner ports. Check igniter electrode. |
| Nevienmērīga apkure | Clogged burner ports, low fuel, wind. | Clean burner ports. Ensure adequate fuel. Position grill away from strong winds. |
| Zema liesma vai liesmas nav | Low fuel, regulator bypass, gas leak. | Check fuel level. Reset regulator by turning off all gas, disconnecting, waiting 1 minute, and reconnecting. Check for leaks. |
| Weber Connect display not working | No power, battery low (if using power bank). | Ensure plugged into outlet or power bank is charged and connected. |
For further assistance, refer to the full troubleshooting guide in your printed manual or contact Weber Klientu apkalpošana.
8. Specifikācijas
| Funkcija | Detaļas |
|---|---|
| Zīmols | Weber |
| Modeļa nosaukums | Genesis Smart SX-335 LP SS |
| Preces modeļa numurs | 35600001 |
| Produkta izmēri | 35.5"D x 31"W x 30.75"H |
| Preces svars | 209 mārciņas |
| Krāsa | Nerūsējošais tērauds |
| Degvielas veids | Šķidrais propāns (LP) |
| Galvenā degļa skaits | 3 |
| Apkures jauda | 13000 britu termiskās vienības (BTU) |
| Ēdienu gatavošanas virsmas laukums | 787 kvadrātcollas |
| Īpaša iezīme | Grease Management System, Weber Connect Smart Technology, Sear Zone, Side Burner, Expandable Top Cooking Grate, Grill Locker |
| Materiāls | Nerūsējošais tērauds |
| Nepieciešama montāža | Jā |
9. Garantija un atbalsts
The Weber Genesis Smart SX-335 LP SS Liquid Propane Grill comes with a 12 gads ierobežota garantija. For detailed warranty information, please refer to the warranty card included with your product or visit the official Weber webvietne.
For customer support, technical assistance, or to order replacement parts, please visit the Weber veikals vietnē Amazon vai sazinieties Weber directly through their official channels.
Saistītie dokumenti — SX-335
 |
WebGenesis S-335 LP gāzes grila montāžas rokasgrāmata Visaptverošas montāžas instrukcijas priekš Weber Genesis S-335 LP šķidrā propāna gāzes grils. Šajā rokasgrāmatā ir sniegti detalizēti norādījumi, detaļu saraksti, instrumentu prasības un svarīga drošības informācija, un viss saturs skaidrības un pieejamības labad ir sniegts angļu valodā. |
 |
WebGenesis E-325, E-335, EP-335 īsā lietošanas pamācība: grila gatavošanas instrukcijas Šajā īsajā lietošanas pamācībā ir sniegti svarīgi norādījumi par WebGenesis E-325, E-335 un EP-335 grili. Apgūstiet tiešās un netiešās gatavošanas metodes, izprotiet degļu iestatījumus un izmantojiet piederumus optimāliem grilēšanas un cepšanas rezultātiem. Iekļauti ikonu apzīmējumi un gatavošanas tabulas. |
 |
WebGenesis II EX-335 SX-335 montāžas rokasgrāmata Visaptveroša montāžas rokasgrāmata priekš Weber Genesis II EX-335 and SX-335 LP gas grills, providing step-by-step instructions, safety tips, and essential setup information for a successful build. |
 |
WebGenesis II EX-335 SX-335 montāžas rokasgrāmata Visaptveroša montāžas rokasgrāmata priekš WebGenesis II EX-335 un SX-335 propāna gāzes griliem. Iekļautas soli pa solim instrukcijas un detaļu saraksti. |
 |
Weber Genesis II EX-335/SX-335 lietotāja rokasgrāmata — grilēšanas rokasgrāmata Visaptveroša lietotāja rokasgrāmata par WebGenesis II EX-335 un SX-335 gāzes griliem. Uzziniet par GS4 grila sistēmu, WEBER CONNECT tehnoloģija, drošība, uzstādīšana, ekspluatācija, apkope un problēmu novēršana optimālai ēdiena gatavošanai ārpus telpām. |
 |
WebGenesis E-315/E-415 LP montāžas rokasgrāmata Visaptverošas soli pa solim montāžas instrukcijas WebGenesis E-315 un E-415 sašķidrinātās gāzes griliem, tostarp detaļu identifikācija, montāžas procedūras un svarīga informācija pirms un pēc montāžas. |