1. Ievads
Thank you for choosing the Xigmatek Lux M Micro-ATX Mini Tower PC Case. This manual provides detailed instructions for the installation, operation, and maintenance of your new PC chassis. Please read this manual carefully before beginning the assembly process to ensure proper installation and to maximize the performance and longevity of your system.
The Lux M case is designed to offer a robust and aesthetically pleasing housing for your computer components, featuring a tempered glass side panel, a metallic front panel with a unique cut-out pattern, and pre-installed fixed RGB fans for optimal cooling and visual appeal. It supports Micro-ATX and Mini-ITX motherboards and is compatible with various cooling solutions, including water cooling.
2. Drošības informācija
Uzstādīšanas un ekspluatācijas laikā, lūdzu, ievērojiet šādus drošības pasākumus:
- Always disconnect the power supply from the wall outlet before installing or removing any components to prevent electric shock.
- Handle all components with care. Avoid touching circuit boards directly; hold them by their edges.
- Wear an anti-static wrist strap when handling sensitive electronic components to prevent electrostatic discharge (ESD) damage.
- Keep the case and components away from liquids, excessive heat, and direct sunlight.
- Nodrošiniet atbilstošu ventilāciju ap datora korpusu, lai novērstu pārkaršanu.
- Sargājiet mazās detaļas un skrūves bērniem nepieejamā vietā.
3. Iepakojuma saturs
Pārliecinieties, vai iepakojumā ir visas preces. Ja kādas preces trūkst vai ir bojātas, lūdzu, sazinieties ar savu mazumtirgotāju.
- Xigmatek Lux M Micro-ATX Mini Tower PC Case
- Accessory box (containing screws, standoffs, cable ties, etc.)
- Lietotāja rokasgrāmata (šis dokuments)
4. Produkts beidziesview
Familiarize yourself with the various parts of your Xigmatek Lux M PC case.
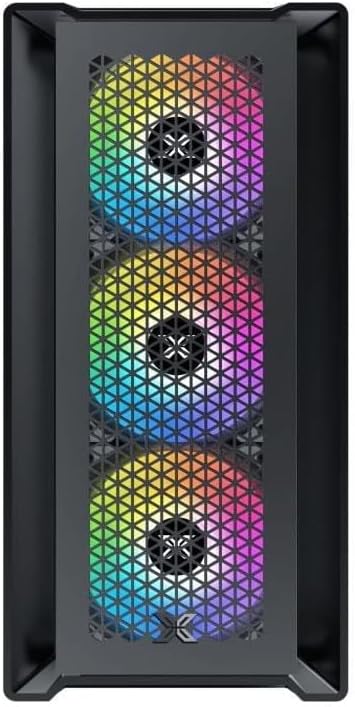
4.1. attēls. Priekšpuse View. This image displays the front of the Xigmatek Lux M case, highlighting the metallic mesh panel with a triangular design and the three pre-installed 120mm fixed RGB fans.

Figure 4.2: Angled Top-Front View. This perspective shows the tempered glass side panel, offering a clear view of the interior, and the top panel with its I/O ports (USB, audio) and power button.
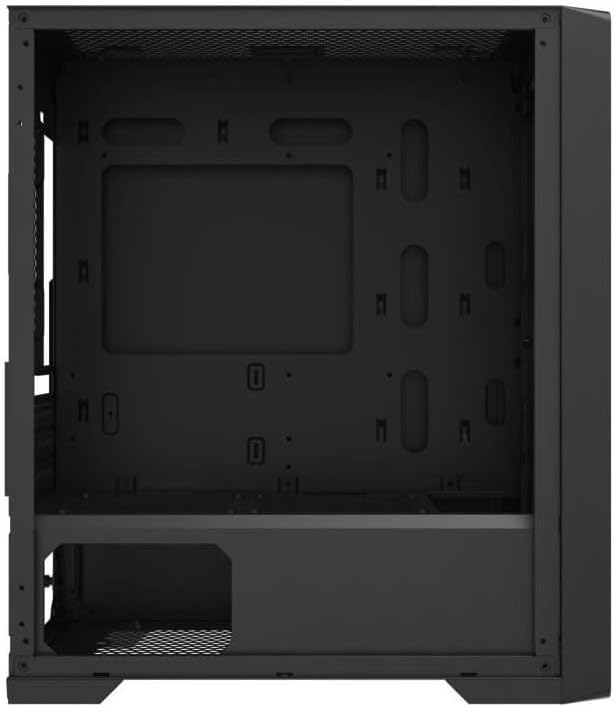
Figure 4.3: Interior Layout. The internal structure of the case, featuring the motherboard mounting tray, cutouts for cable management, and the power supply shroud at the bottom.
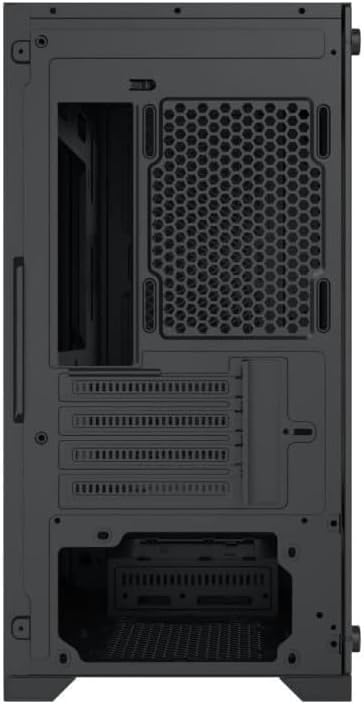
4.4. attēls. Aizmugure View. This image illustrates the rear of the case, including the expansion slots for graphics cards and other add-in cards, the rear fan mounting area, and the power supply mounting bracket.
5. Iestatīšana un instalēšana
Follow these steps to install your computer components into the Xigmatek Lux M case.
5.1. Lietas sagatavošana
- Novietojiet korpusu uz līdzenas, stabilas virsmas.
- Remove the tempered glass side panel by unscrewing the thumb screws and carefully lifting it off. Set it aside on a soft, non-abrasive surface.
- Remove the opposite steel side panel by unscrewing the thumb screws and sliding it backward.
5.2. Mātesplates uzstādīšana
The Lux M supports Micro-ATX and Mini-ITX motherboards.
- Install the I/O shield (if not pre-installed on your motherboard) into the rear opening of the case.
- Align the motherboard with the pre-installed standoffs. Ensure all screw holes on the motherboard match the standoffs.
- Secure the motherboard using the provided motherboard screws. Do not overtighten.
5.3. Barošanas bloka (PSU) uzstādīšana
The PSU mounts at the rear bottom of the case.
- Slide the PSU into its designated compartment from the rear of the case.
- Align the PSU's screw holes with the holes on the case's rear panel.
- Secure the PSU with the provided screws.
5.4. Storage Drive Installation (2.5"/3.5" Drives)
The case supports 2x 2.5"/3.5" storage drives.
- Locate the drive cage beneath the PSU shroud or dedicated 2.5" mounting points behind the motherboard tray.
- For 3.5" HDDs, slide the drive into a drive tray (if applicable) and secure it with screws.
- For 2.5" SSDs, secure them directly to the mounting points using the provided screws.
5.5. Grafikas kartes (VGA) un paplašināšanas kartes uzstādīšana
Korpuss atbalsta grafikas kartes līdz 320 mm garumā.
- Noņemiet nepieciešamos paplašināšanas slotu pārsegus no korpusa aizmugures.
- Insert your graphics card or other expansion card into the appropriate PCIe slot on your motherboard.
- Secure the card to the case using the expansion slot screws.
5.6. Cooling System Installation (Optional)
The Lux M comes with 4x 120mm X24F fixed RGB fans. It supports additional cooling options.
- CPU dzesētājs: Max height of 160mm. Install your CPU cooler according to its manufacturer's instructions.
- Radiatora atbalsts: The case supports radiators of 360mm, 240mm, or 120mm. Refer to your radiator's manual for installation. Common mounting locations include the front and top panels.
5.7. Kabeļu vadība
Izmantojiet kabeļu vadīšanas izgriezumus un nostiprināšanas punktus aiz mātesplates paliktņa, lai sakārtotu kabeļus. Tas uzlabo gaisa cirkulāciju un estētiku.
5.8. Noslēguma montāža
- Once all components are installed and cables are managed, reattach the steel side panel and secure it with thumb screws.
- Carefully reattach the tempered glass side panel and secure it with thumb screws.
6. Lietošanas instrukcijas
After completing the installation, connect your peripherals (monitor, keyboard, mouse) and power cable to the PC. Press the power button located on the top panel of the case to start your system.
The pre-installed X24F RGB fans feature fixed RGB lighting, which will illuminate automatically upon system power-on. No additional software or controller is required for their basic operation.
Ensure that the case's ventilation is not obstructed to maintain optimal airflow and cooling performance.
7. Apkope
Regulāra apkope palīdz nodrošināt datora komponentu ilgmūžību un optimālu veiktspēju.
- Putekļu tīrīšana: Periodically clean dust filters (if present) and the interior of the case using compressed air or a soft brush. Dust accumulation can hinder airflow and lead to overheating.
- Ārpuses tīrīšana: Noslaukiet ārējās virsmas ar mīkstu, damp cloth. Avoid harsh chemicals that may damage the finish or tempered glass.
- Rūdīts stikls: Clean the tempered glass panel with a glass cleaner and a microfiber cloth to avoid scratches and streaks.
8. Traucējummeklēšana
Ja instalēšanas laikā vai pēc tās rodas problēmas, apsveriet tālāk norādītās bieži sastopamās problēmu novēršanas darbības.
- Nav jaudas:
- Pārliecinieties, vai strāvas kabelis ir droši pievienots gan barošanas blokam, gan sienas kontaktligzdai.
- Check that the PSU switch is in the 'ON' position.
- Pārliecinieties, vai priekšējā paneļa barošanas slēdža kabelis ir pareizi pievienots mātesplates priekšējā paneļa kontaktligzdai.
- Fans Not Spinning / RGB Not Lighting:
- Ensure all fan power cables are securely connected to the motherboard or a fan controller.
- For RGB, confirm that any necessary RGB headers are connected to the motherboard (though the included fans are fixed RGB and should light up with power).
- Nav displeja izvades:
- Verify that your monitor cable is connected to the graphics card (if installed) and not the motherboard's integrated graphics port.
- Ievietojiet grafikas karti atpakaļ PCIe slotā.
- Pārkaršana:
- Ensure all case fans are spinning and oriented correctly for optimal airflow (intake/exhaust).
- Notīriet visus putekļu filtrus un iekšējās sastāvdaļas.
- Verify that the CPU cooler is properly seated and making good contact with the CPU.
For more complex issues, consult your component manuals or seek assistance from Xigmatek support or a qualified technician.
9. Specifikācijas
| Funkcija | Specifikācija |
|---|---|
| Zīmols | Xigmatek |
| Modeļa nosaukums | Lux M |
| Modeļa numurs | EN48540 |
| Lietas veids | Mini tornis |
| Mātesplates saderība | Micro-ATX, Mini-ITX |
| Materiāls | Tempered Glass (side panel), Metal (front panel) |
| Krāsa | Melns |
| Iepriekš instalēti ventilatori | 4 x 120mm X24F Fixed RGB Fans |
| Radiatoru atbalsts | 360mm, 240mm, 120mm |
| Maksimālais CPU dzesētāja augstums | 160 mm |
| Maks. VGA garums | 320 mm |
| Maksimālais PSU garums | 165 mm |
| Uzglabāšanas nodalījumi | 2x 2.5"/3.5" |
| Īpašas funkcijas | RGB Lighting, Triangular Mesh Front Design |
10. Garantija un atbalsts
Xigmatek products are manufactured to the highest quality standards. For warranty information and technical support, please refer to the warranty card included with your product or visit the official Xigmatek webvietne. Lūdzu, saglabājiet pirkuma apliecinājumu garantijas prasību iesniegšanai.
For further assistance, you may contact Xigmatek customer support through their official channels.