Ievads
Welcome to the user manual for your TAB Fairy10 Robot Vacuum and Mop Combo. This advanced cleaning device is designed to provide comprehensive floor care with its powerful 6000 Pa suction, hidden LiDAR navigation for precise mapping, and intelligent features such as self-drying, auto-empty, and auto-refill capabilities. Its 15mm auto-lift dual mops and AI 3.0 obstacle avoidance ensure efficient and thorough cleaning across various floor types.
Iepakojuma saturs
Lūdzu, pārliecinieties, ka jūsu iepakojumā ir iekļautas visas tālāk norādītās preces:
- Robot Vacuum × 1
- Uzlādes pamatne × 1
- Adapteris × 1
- HEPA Filters × 4 (2 pairs)
- Tīrīšanas birste × 1
- Side Brushes × 4 (2 pairs)
- Lietotāja rokasgrāmata × 1
- Barošanas kabelis × 1
- Disposable Dust Bags × 2
- Mop Cloths × 2 Pairs

Figure 1: All included components in the TAB Fairy10 package.
Iestatīšana
1. Izpakošana un novietošana
- Remove all packaging materials and protective films from the robot and the charging base.
- Place the charging base against a wall on a hard, level surface. Ensure there is at least 0.5 meters (1.6 feet) of clear space on both sides and 1.5 meters (4.9 feet) in front of the base.
- Connect the power cable to the charging base and plug it into a power outlet.
2. Robota uzlāde
- Place the robot onto the charging base. Ensure the charging contacts on the robot align with those on the base.
- The robot will automatically begin charging. For first-time use, fully charge the robot before operation (approximately 6 hours).
3. Ūdens tvertņu uzpildīšana
- Open the top cover of the charging base to access the clean water tank and dirty water tank.
- Remove the clean water tank and fill it with clean tap water. You may add a small amount of non-foaming, robot-safe cleaning solution if desired.
- Ensure the dirty water tank is empty before starting a cleaning cycle.
- Return both tanks to their respective slots in the charging base.

Figure 2: The TAB Fairy10 Robot Vacuum and its comprehensive charging station.

3. Attēls: beidziesview of the station's automated functions: self-cleaning, self-emptying, self-drying, and self-refilling.
Lietošanas instrukcijas
1. Ieslēgšana/izslēgšana
- To power on, press and hold the power button on the robot for 3 seconds until the indicator lights up.
- To power off, press and hold the power button for 3 seconds while the robot is stationary.
2. Savienojuma izveide ar mobilo lietotni
- Download the official TAB app from your smartphone's app store.
- Follow the in-app instructions to connect your robot to your home Wi-Fi network. This will enable remote control, scheduling, map management, and cleaning mode selection.
3. Tīrīšanas režīmi
The TAB Fairy10 supports various cleaning modes, selectable via the mobile app:
- Vakuuma režīms: Sausu gružu savākšanai.
- Mop režīms: Cieto grīdu mitrai tīrīšanai.
- Vakuuma un mopa režīms: Vienlaicīga putekļsūcēja un grīdas mazgāšana.
- Vietas tīrīšana: Concentrated cleaning for specific dirty areas.
- Zonas tīrīšana: Notīra lietotāja definētās zonas kartē.
4. Navigācija un šķēršļu apiešana
The robot utilizes hidden LiDAR navigation to create precise maps of your home, ensuring efficient cleaning paths. Its AI 3.0 obstacle avoidance technology helps it detect and navigate around common household items, reducing the chance of getting stuck.
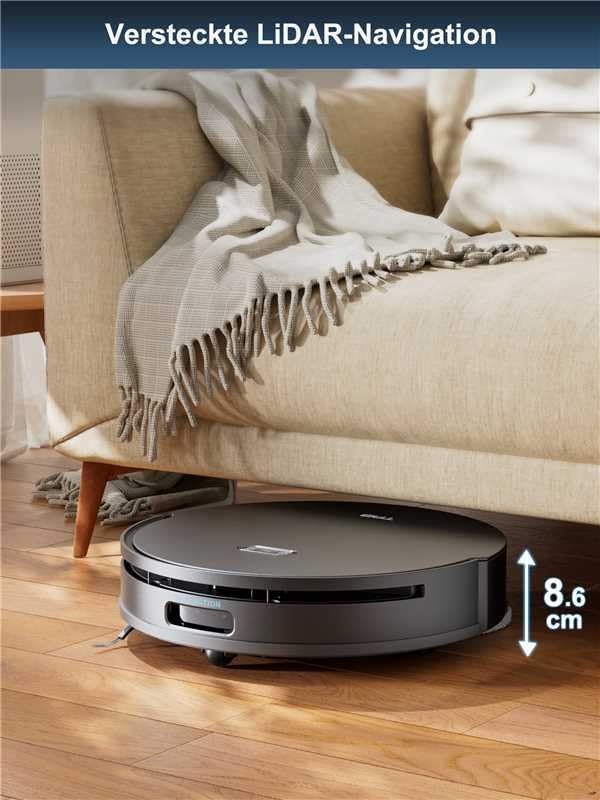
Figure 4: The robot's hidden LiDAR navigation allows it to clean under furniture effectively.
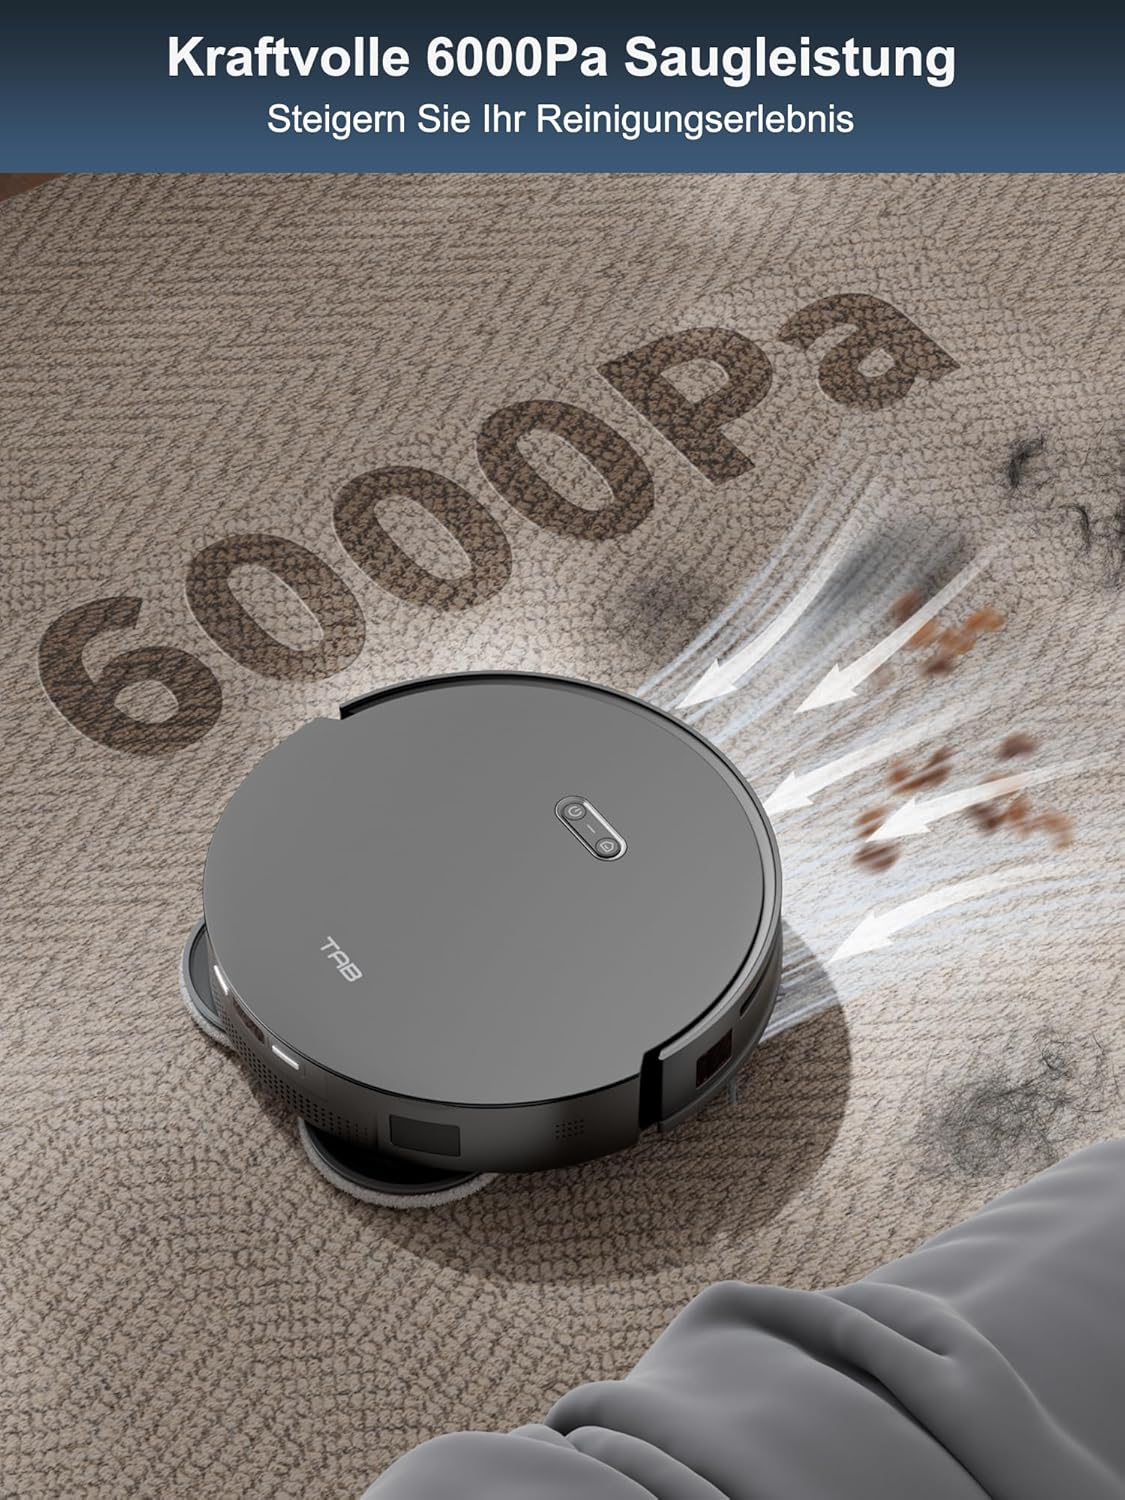
Figure 5: The powerful 6000Pa suction ensures thorough cleaning of various debris.

Figure 6: AI 3.0 obstacle avoidance helps the robot navigate around household items.
5. Automatic Mop Lifting and Dual Dirt Solution
The robot features automatic mop lifting by 15mm when it detects carpets, preventing wetting. For mopping, it applies 10N pressure and rotates at 180 rpm, providing effective scrubbing for stubborn dirt.

Figure 7: The automatic 15mm mop lifting feature protects carpets during mopping cycles.

Figure 8: The dual dirt solution combines high-speed rotation and pressure for effective mopping.
Apkope
Regulāra apkope nodrošina optimālu veiktspēju un pagarina robota putekļsūcēja kalpošanas laiku.
1. Emptying the Dustbin and Replacing Dust Bag
- The robot automatically empties its internal dustbin into the disposable dust bag in the charging base.
- Replace the disposable dust bag in the charging base when the indicator light or app notification indicates it is full.
2. Mopu paliktņu tīrīšana
- The charging base automatically cleans and dries the mop pads after each mopping cycle.
- Periodically remove the mop pads and hand wash them with water and mild detergent to remove any residual dirt. Allow them to air dry completely before reattaching.
3. Filtru tīrīšana
- Tap the HEPA filters gently to remove loose dust. Do not wash HEPA filters with water.
- Nomainiet HEPA filtrus ik pēc 3–6 mēnešiem vai pēc nepieciešamības atkarībā no lietošanas biežuma.
4. Tīrīšanas birstes
- Remove the main brush and side brushes. Use the provided cleaning tool to cut and remove any tangled hair or debris.
- Wipe the brushes with a dry cloth.
5. Sensoru un uzlādes kontaktu tīrīšana
- Wipe all sensors (cliff sensors, wall sensor, LiDAR sensor window) and charging contacts on both the robot and the charging base with a clean, dry cloth.
Problēmu novēršana
| Problēma | Iespējamais cēlonis | Risinājums |
|---|---|---|
| Robots neieslēdzas vai neuzlādējas. | Battery low; charging contacts dirty; power cable disconnected. | Ensure robot is on charging base; clean charging contacts; check power cable connection. |
| Robots bieži iesprūst. | Šķēršļi ceļā; netīri sensori. | Clear cables, small objects, and thick rugs; clean all sensors. |
| Slikta tīrīšanas veiktspēja. | Dustbin full; brushes tangled; filters clogged; water tank empty. | Empty dustbin; clean/replace brushes; clean/replace filters; refill clean water tank. |
| Problēmas ar lietotnes savienojumu. | Incorrect Wi-Fi password; robot too far from router; app outdated. | Verify Wi-Fi credentials; move robot closer to router; update app; restart robot and router. |
| Mopa spilventiņi nepareizi žūst. | Insufficient airflow; station vents blocked. | Ensure station is in a well-ventilated area; clear any obstructions around station vents. |
Specifikācijas
| Funkcija | Specifikācija |
|---|---|
| Zīmols | TAB |
| Modeļa nosaukums | Fairy 10 (M50-PT-US) |
| Īpaša iezīme | Auto-Docking, Self-Drying, Auto Empty & Refill, 15mm Auto-Lift Dual Mops, Obstacle Avoidance |
| Krāsa | Melns |
| Produkta izmēri (G x P x A) | 18.8 cm x 18.8 cm x 19.2 cm |
| Filtra veids | Kārtridža (HEPA) |
| Akumulatora darbības laiks | 120 minūtes |
| Barošanas avots | Darbojas ar baterijām |
| Litija akumulators Voltage | 3.6 volts |
| Formas faktors | Rectangular (Base), Round (Robot) |
| Preces svars | 41.5 mārciņas |
| Ražotājs | SHENZHEN FENGCHAO NEW TECHNOLOGY CO., LTD |
| Datums pirmais pieejams | 7. gada 2024. novembris |
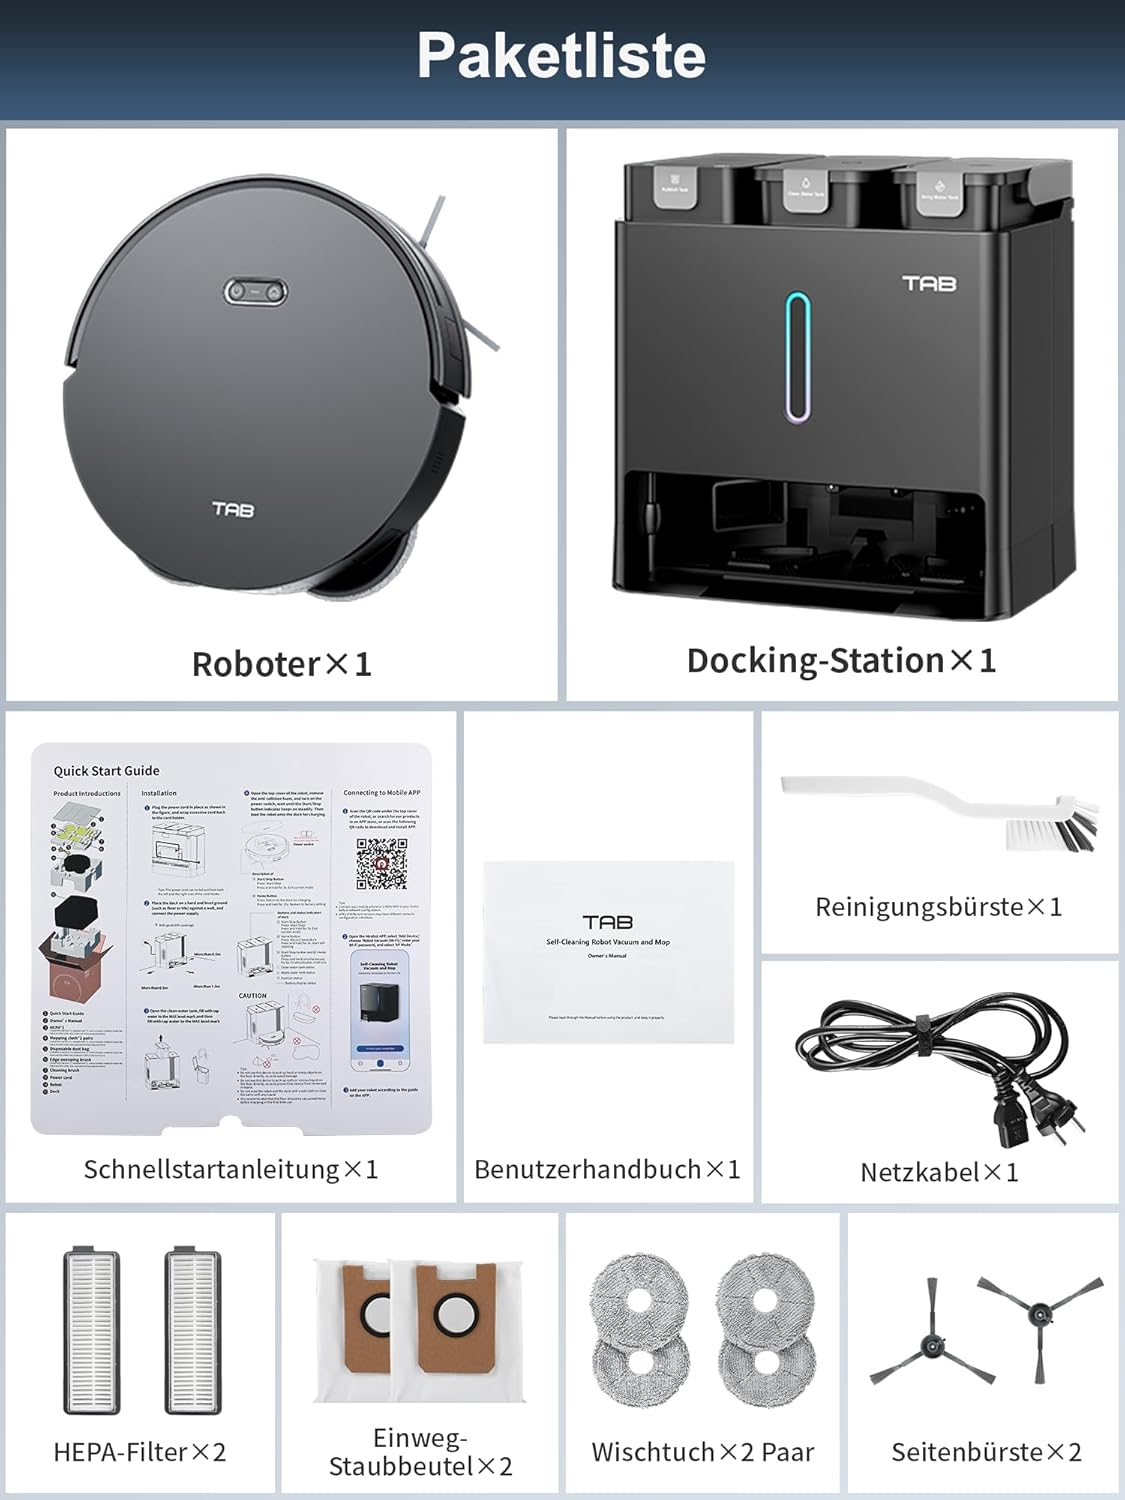
Figure 9: Regulatory and manufacturing information.
Garantija un atbalsts
The TAB Fairy10 Robot Vacuum and Mop Combo comes with a manufacturer's warranty. For specific warranty terms and conditions, please refer to the warranty card included in your package or contact TAB customer support.
For technical assistance, troubleshooting, or spare parts inquiries, please contact the manufacturer or your point of purchase. Keep your purchase receipt and product serial number handy when contacting support.


