BlitzWolf BW-VT2 mini projektora lietotāja rokasgrāmata
Your comprehensive guide to setting up, operating, and maintaining your BlitzWolf BW-VT2 Mini Projector.
1. Produkts beidziesview
1.1. Iepakojuma saturs
Lūdzu, pārliecinieties, vai jūsu iepakojumā ir visas preces:
- BlitzWolf BW-VT2 Mini Projector
- Tālvadības pults
- Strāvas adapteris
- HDMI kabelis
- Lietotāja rokasgrāmata (šis dokuments)
1.2 Ierīces izkārtojums
Familiarize yourself with the various parts and ports of your projector.
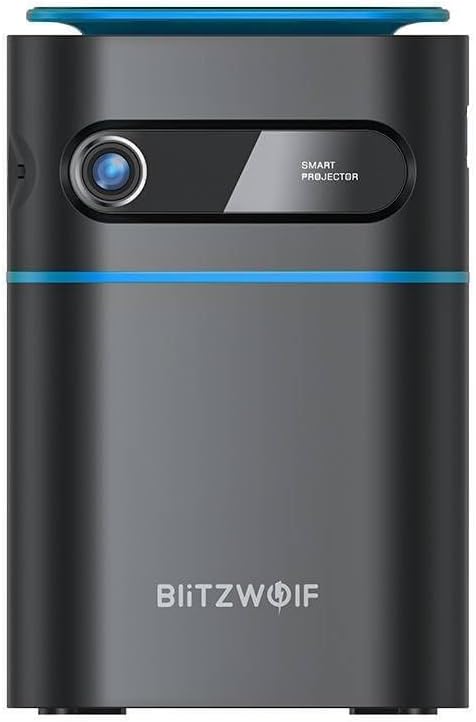
1.1. attēls. Priekšpuse View. This image displays the front of the BlitzWolf BW-VT2 Mini Projector, highlighting the projection lens and the 'SMART PROJECTOR' branding.

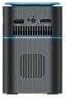
Figure 1.2: Projector with Remote Control. This image shows the BlitzWolf BW-VT2 Mini Projector alongside its dedicated remote control, illustrating the compact size of both devices.
1.3. attēls. Aizmugure View. The rear of the projector is shown, featuring ventilation grilles and various input/output ports.

1.4. attēls: sāni View. This image highlights the side of the projector where additional connectivity options such as USB and HDMI ports are located.

1.5. attēls: augšdaļa View. The top surface of the projector is visible, featuring the integrated touch control panel for direct interaction.
1.3 Porti un vadības ierīces
- HDMI ports: Connect to laptops, game consoles, Blu-ray players, etc.
- USB ports: Pievienojiet USB zibatmiņas diskus multivides atskaņošanai.
- Audio Out (3.5mm) Port: Pievienojiet ārējos skaļruņus vai austiņas.
- DC IN ports: Pievienojiet strāvas adapteri.
- Barošanas poga: Ieslēdz/izslēdz projektoru.
- Fokusa ritenis: Pielāgo attēla skaidrību.
- Pieskarieties Vadības panelis: Navigate menus and control playback directly on the device.
2. Iestatīšanas rokasgrāmata
2.1. Ieslēgšanās
- Pievienojiet strāvas adapteri projektora DC IN portam.
- Pievienojiet strāvas adapteri sienas kontaktligzdai.
- Press and hold the Power Button on the projector or the remote control until the device powers on.
2.2 Sākotnējā izvietošana
Optimālam viewing experience, consider the following:
- Novietojiet projektoru uz stabilas, līdzenas virsmas.
- Ensure there is adequate ventilation around the projector to prevent overheating.
- Lai iegūtu taisnstūrveida attēlu, novietojiet projektoru perpendikulāri projekcijas virsmai (sienai vai ekrānam).
- Adjust the distance to achieve your desired screen size.
2.3. Fokusa pielāgošana
After powering on, adjust the focus to ensure a clear image:
- Rotate the focus wheel located near the lens until the projected image appears sharp and clear.
2.4 Tālvadības pults iestatīšana
Insert batteries into the remote control before first use:
- Atveriet bateriju nodalījuma vāku tālvadības pults aizmugurē.
- Ievietojiet divas AAA baterijas (nav iekļautas komplektā), nodrošinot pareizu polaritāti (+/-).
- Aizveriet akumulatora nodalījuma vāku.
3. Lietošanas instrukcijas
3.1. Navigācija
You can navigate the projector's interface using either the remote control or the touch control panel on top of the device.
- Tālvadības pults: Use the directional buttons (up, down, left, right) to move through menus and the 'OK' button to select.
- Pieskarieties Vadības panelis: Swipe and tap on the touch-sensitive surface to navigate.
3.2. Ierīču pievienošana
The BW-VT2 supports various input sources:
- HDMI ieeja: Connect your laptop, game console, or other HDMI-enabled devices using an HDMI cable. Select the HDMI input source from the projector's menu.
- USB ieeja: Insert a USB flash drive into the USB port. The projector's media player will typically detect the drive automatically, allowing you to browse and play supported media files (videos, photos, music).
- Wi-Fi savienojums: Navigate to the 'Settings' menu, then 'Network' or 'Wi-Fi'. Select your Wi-Fi network and enter the password to connect the projector to the internet. This enables access to online streaming apps and updates.
3.3 Android OS Features
As an Android-powered projector, the BW-VT2 offers smart functionalities:
- Lietotņu piekļuve: Download and install various streaming apps (e.g., Netflix, YouTube) directly from the pre-installed app store or by sideloading APKs.
- Iestatījumi: Customize display settings, audio output, network configurations, and system preferences through the Android settings menu.
- Ekrāna spoguļošana: Utilize built-in screen mirroring features (e.g., Miracast, AirPlay compatible apps) to project content from your smartphone or tablet wirelessly.
3.4 Audio izvade
The projector has built-in speakers, but you can also connect external audio devices:
- 3.5 mm audio izeja: Connect headphones or external speakers via the 3.5mm audio jack for enhanced sound.
4. Apkope
Pareiza apkope nodrošina projektora ilgmūžību un optimālu veiktspēju.
4.1 Objektīva tīrīšana
To maintain clear image quality, clean the projector lens regularly:
- Izmantojiet mīkstu, nepūkošu drānu, kas īpaši paredzēta optiskajām lēcām.
- Viegli noslaukiet objektīvu ar apļveida kustībām.
- Avoid using abrasive cleaners or excessive force, which can scratch the lens.
4.2 Ventilācija
Ensure proper airflow to prevent overheating:
- Do not block the ventilation vents on the projector.
- Darbiniet projektoru labi vēdināmā telpā.
- Periodically clean dust from the vents using a soft brush or compressed air.
4.3. Uzglabāšana
When not in use, store your projector properly:
- Uzglabājiet projektoru vēsā, sausā vietā, pasargājot no tiešiem saules stariem un ekstremālām temperatūrām.
- Use the original packaging or a protective case to prevent dust accumulation and physical damage.
5. Traucējummeklēšana
Biežāk sastopamās problēmas un to risinājumus skatiet šajā sadaļā.
| Problēma | Iespējamais cēlonis | Risinājums |
|---|---|---|
| Projektors neieslēdzas. | No power connection; faulty power adapter. | Ensure power adapter is securely connected to both projector and outlet. Try a different outlet. |
| Nav projicēts attēls. | Incorrect input source selected; loose HDMI/USB cable. | Verify the correct input source is selected in the menu. Check cable connections. |
| Attēls ir izplūdis. | Focus not adjusted; projector too close/far. | Rotate the focus wheel until the image is clear. Adjust projection distance if necessary. |
| Nav skaņas. | Volume too low; external audio device not connected properly. | Increase volume. Check connections to external speakers/headphones. Ensure audio output is set correctly in settings. |
| Wi-Fi savienojuma problēmas. | Nepareiza parole; problēmas ar maršrutētāju; signāla traucējumi. | Re-enter Wi-Fi password. Restart router. Move projector closer to router. |
| Tālvadības pults nedarbojas. | Izlādējušās baterijas; šķērslis; tālvadības pults nav savienota pārī. | Replace batteries. Ensure no obstruction between remote and projector. |
6. Tehniskās specifikācijas
Key specifications of the BlitzWolf BW-VT2 Mini Projector:
| Funkcija | Specifikācija |
|---|---|
| Zīmols | BlitzWolf |
| Modeļa numurs | BW-VT2EU |
| Krāsa | Melns |
| Savienojamības tehnoloģija | HDMI, USB, VGA, Wi-Fi |
| Displeja izšķirtspēja | 1920 x 1080 (Full HD) |
| Displeja veids | LCD, LED |
| Formas faktors | Pārnēsājams |
| Īpašas funkcijas | Portable, Android OS, Wi-Fi, HDMI, USB, VGA |
| Saderīgas ierīces | Laptops, Smartphones, Game Consoles, Blu-ray Players, Media Players, Wi-Fi enabled devices |
| Ieteicamie lietojumi | Mājas kinozāle |
7. Garantija un atbalsts
7.1 Ražotāja garantija
The BlitzWolf BW-VT2 Mini Projector comes with a 2 gada ražotāja garantijaŠī garantija attiecas uz materiālu un izgatavošanas defektiem normālas lietošanas apstākļos. Lūdzu, saglabājiet pirkuma apliecinājumu garantijas prasību iesniegšanai.
7.2 Klientu atbalsts
If you encounter issues not covered in the troubleshooting section or require further assistance, please contact BlitzWolf customer support. Refer to the product packaging or the official BlitzWolf webvietne, kurā atrodama visjaunākā kontaktinformācija.